4.6. Managing Virtual Machines
Each virtual machine (VM) is an independent system with an independent set of virtual hardware. Its main features are the following:
- A virtual machine resembles and works like a regular computer. It has its own virtual hardware. Software applications can run in virtual machines without any modifications or adjustment.
- Virtual machine configuration can be changed easily, e.g., by adding new virtual disks or memory.
- Although virtual machines share physical hardware resources, they are fully isolated from each other (file system, processes, sysctl variables) and the compute node.
- A virtual machine can run any supported guest operating system.
The following table lists the current virtual machine configuration limits:
| Resource | Limit |
|---|---|
| RAM | 1 TiB |
| CPU | 48 logical CPUs |
| Storage | 15 volumes, 512 TiB each |
| Network | 15 NICs |
A logical CPU is a core (thread) in a multicore (multithreading) processor.
4.6.1. Supported Guest Operating Systems
The following guest operating systems have been tested and are supported in virtual machines:
| Operating System | Edition | Architecture |
|---|---|---|
| Windows Server 2016 | Essentials, Standard, Datacenter | x64 |
| Windows Server 2012 R2 | Essentials, Standard, Datacenter | x64 |
| Windows Server 2012 | Standard, Datacenter | x64 |
| Windows Server 2008 R2 | Standard, Datacenter | x64 |
| Windows 10 | Home, Professional, Enterprise, Enterprise 2016 LTSB | x86, x64 |
| Windows 8.1 | Home, Professional, Enterprise | x86, x64 |
| Windows 7 | Home, Professional, Enterprise | x86, x64 |
| Operating System | Architecture |
|---|---|
| CentOS 7.x | x64 |
| CentOS 6.6 | x64 |
| RHEL 7.3 | x64 |
| Debian 9.x | x64 |
| Ubuntu 16.04.x | x64 |
4.6.2. Creating and Deleting Virtual Machines
Before you proceed to creating VMs, check that you have these:
A guest OS source (see Managing Images):
a distribution ISO image of a guest OS to install in the VM, or
a boot volume template, or
a boot volume.
Note
To obtain a boot volume, create a volume as described in Managing Volumes, attach it to a VM, install an operating system in it, then detach it from the VM.
A storage policy for volumes (see Managing Storage Policies).
A flavor (see Managing Flavors).
One or more virtual networks (see Managing Virtual Networks).
Note
Virtual machines are created with the host CPU model by default. Having compute nodes with different CPUs may lead to live migration issues. To avoid them, you can manually set CPU model for all new VMs as described in the Administrator’s Command Line Guide.
To create a VM, do the following:
On the COMPUTE > VIRTUAL MACHINES tab, click Create VM. A window will open where you will need to specify VM parameters.
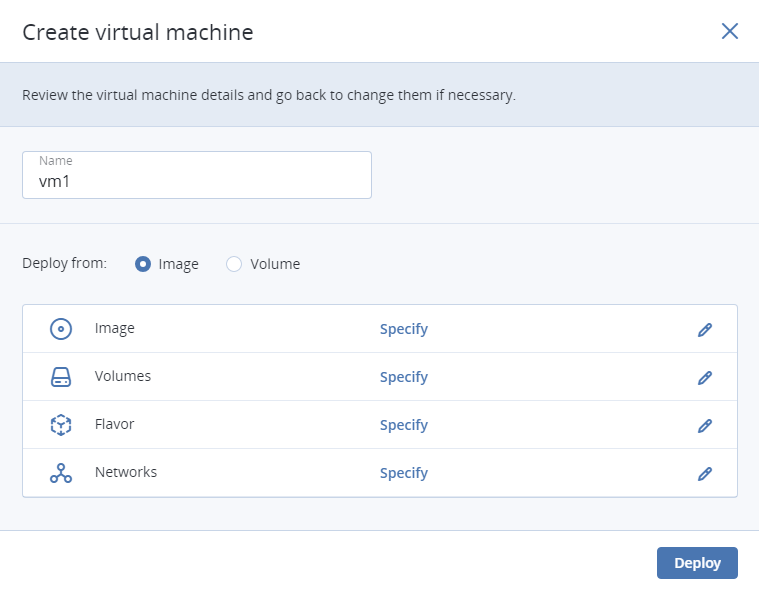
Specify a name for the new VM.
In Deploy from, choose Volume if you have a boot volume or want to create one. Otherwise, choose Image.
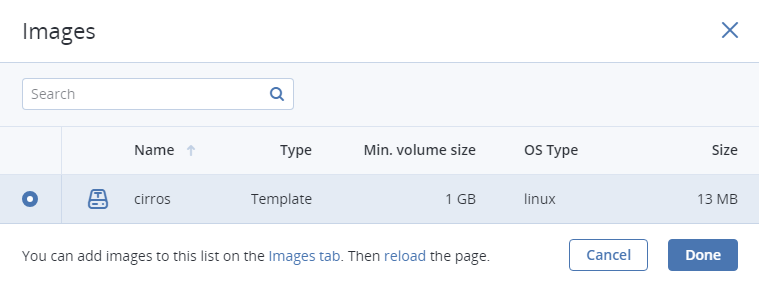
Depending on your choice, click the pencil icon in the Volumes or Image section and do one of the following:
- In the Images window, select the ISO image or template and click Done.
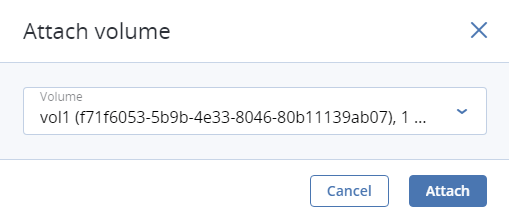
- In the Volumes window, do one of the following:
- If you have prepared a volume with an installed guest OS, click Attach, find and select the volume, and click Done.
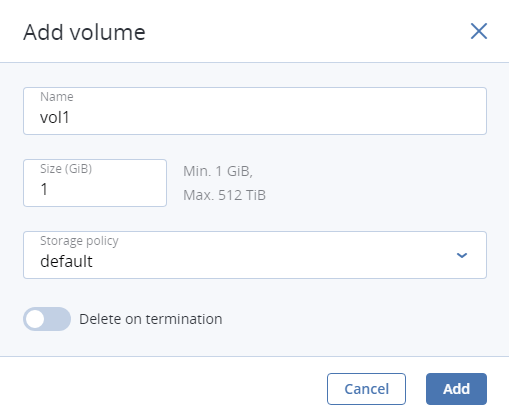
Optionally, in the Volumes window, click Add new or Attach new to create or attach any other volumes you need. To select a volume as bootable, place it first in the list by clicking the up arrow button next to it.
In the Flavor window, choose a flavor and click Done.

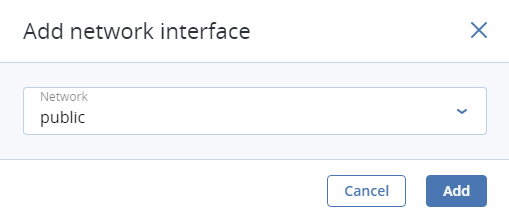
In the network window, click Add, select a virtual network interface and click Add. It will appear in the Network interfaces list.
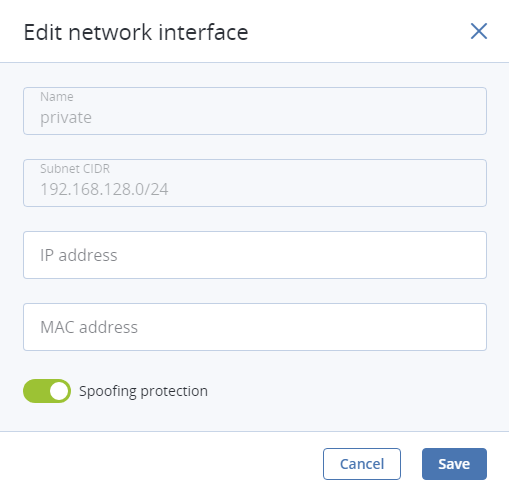
To edit additional parameters of network interfaces that you have just added (IP and MAC addresses and spoofing protection), click interface’s ellipsis icon, click Edit, and specify needed details in the Edit network interface window. Click Save.
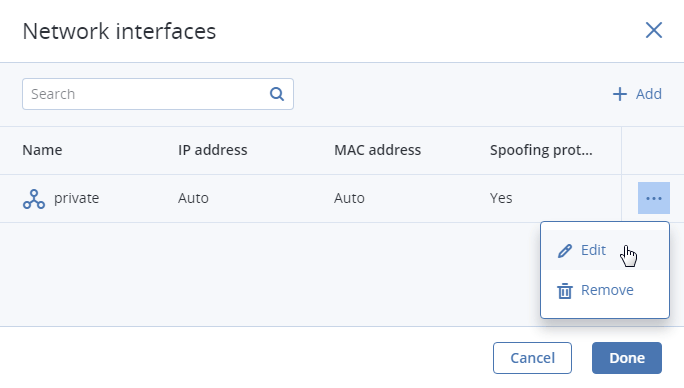
You will not be able to edit these parameters later. Instead, you will be able to delete old network interface and replace it with a new one.
Click Done.
Back in the Create virtual machine window, click Deploy to create and boot the VM.
If you are deploying the VM from an ISO image (not a boot volume template or volume with a pre-installed guest OS), select the VM, click Console, and install the guest OS using the built-in VNC console.
To remove a VM, select it, click the ellipsis button next to it, Delete, and Remove. You cannot delete running VMs.
4.6.3. Running, Shutting Down, and Rebooting Virtual Machines
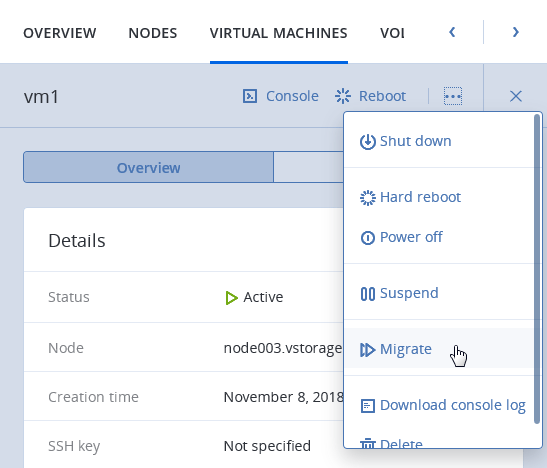
To start, shut down, reboot, or hard reboot a VM, click the ellipsis button next to it and click the desired action.
The start, shutdown, and reboot operations are equivalent to powering up, shutting down, and soft-rebooting a computer, respectively. The hard reboot operation is equivalent to cutting off and restoring power, then starting a computer.
4.6.4. Suspending and Resuming Virtual Machines
Acronis Software-Defined Infrastructure allows you to suspend a running VM by saving its current state to a special file. Later on, you can restore VM’s state by resuming it. Suspending VMs may prove useful, for example, if you need to restart the host but do not want to quit the applications currently running in the VM or spend time on restarting the guest OS.
To suspend or resume a VM, click the ellipsis button next to it and click Suspend or Resume, respectively.
4.6.5. Reconfiguring and Monitoring Virtual Machines
To monitor virtual machine’s CPU, storage, and network usage, select the VM and open the Monitoring tab. To download the VM’s console log (if such logging is enabled inside the VM), click the ellipsis button next to it and Download console log.
To reconfigure a VM, select it and, on the Overview tab, click the pencil icon next to a parameter you need to change. You cannot do the following:
- change, detach, or delete the boot volume;
- manage other volumes except attaching and detaching;
- modify previously added network interfaces;
- change the flavor while the VM is running.
4.6.6. Migrating Virtual Machines
VM migration helps facilitate cluster upgrades and workload balancing between compute nodes. Acronis Software-Defined Infrastructure allows you to perform two types of migration:
- Cold migration for stopped and suspended virtual machines.
- Hot migration for running virtual machines. This migration type is useful when VM downtime is not desirable.
For both migration types, a virtual machine is migrated between compute nodes using shared storage, so no block device migration takes place.
Hot migration consists of the following steps:
- All VM memory is copied to the destination node while the virtual machine keeps running on the source node. If a VM memory page changes, it is copied again.
- When only a few memory pages are left to copy, the VM is stopped on the source node, the remaining pages are transferred, and the VM is restarted on the destination node.
Large virtual machines with write-intensive workloads write to memory faster than memory changes can be transferred to the destination node, thus preventing migration from converging. For such VMs, the auto-converge mechanism is used. When a lack of convergence is detected during live migration, VM’s vCPU execution speed is throttled down, which also slows down writing to VM memory. Initially, virtual machine’s vCPU is throttled by 20% and then by 10% during each iteration. This process continues until writing to VM memory slows down enough for migration to complete or the VM vCPU is throttled by 99%.
Note
Virtual machines are created with the host CPU model by default. Having compute nodes with different CPUs may lead to live migration issues. To avoid them, you can manually set CPU model for all new VMs as described in the Administrator’s Command Line Guide.
To migrate a VM, do the following:
On the COMPUTE > VIRTUAL MACHINES tab, click a VM to migrate, click the ellipsis button and choose Migrate.
In the new window, specify the destination node:
- Auto. Automatically select the optimal destination among cluster nodes based on available CPU and RAM resources.
- Select the destination node manually from the drop-down list.
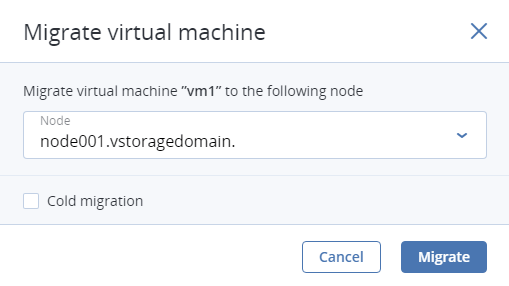
By default, running VMs are migrated live. You can change the migration mode to offline by ticking the Cold migration checkbox. A VM will be stopped and restarted on the destination node after migration.
Click Migrate to reserve resources on the destination node and start migration.
The admin panel will show the migration progress.