3.5. Creating the storage cluster
Before you create the storage cluster, enable high availability of the management node, as described in Enabling high availability.
To create a storage cluster, you need to create a basic storage cluster on one (the first) node, then populate it with more nodes.
If networks adapters on your nodes support RDMA (via RoCE, iWARP or IB), you can enable this functionality either before creating the storage cluster or afterwards, as explained in Enabling RDMA.
3.5.1. Creating the storage cluster on the first node
- Open the Infrastructure > Nodes screen, and then click Create storage cluster.
- (Optional) To configure the disk roles or node location, click the cogwheel icon.
- Type a name for the cluster. It may only contain Latin letters (a-z, A-Z), numbers (0-9), and hyphens (“-“).
- Enable encryption, if required.
- Click Create.
You can monitor cluster creation on the Infrastructure > Nodes screen. The creation might take some time, depending on the number of disks to be configured. Once the automatic configuration is complete, the cluster is created.
3.5.2. Adding nodes to the storage cluster
To add an unassigned node to the storage cluster, do the following:
- On the Infrastructure > Nodes screen, click an unassigned node.
- On the node right pane, click Join to cluster.
- Click Join to have Acronis Cyber Infrastructure assign the roles to disks automatically and add the node to the default location. Alternatively, click the cogwheel icon to configure the disk roles or node location.
3.5.3. Assigning disk roles manually
You can assign disk roles manually when you create a cluster or add a node to it:
On the Join node to storage cluster or Create storage cluster screen, click the cogwheel icon, and then select Disks.
In the list, select the required disk, and then click Configure.
On the Choose role screen, select a disk role:
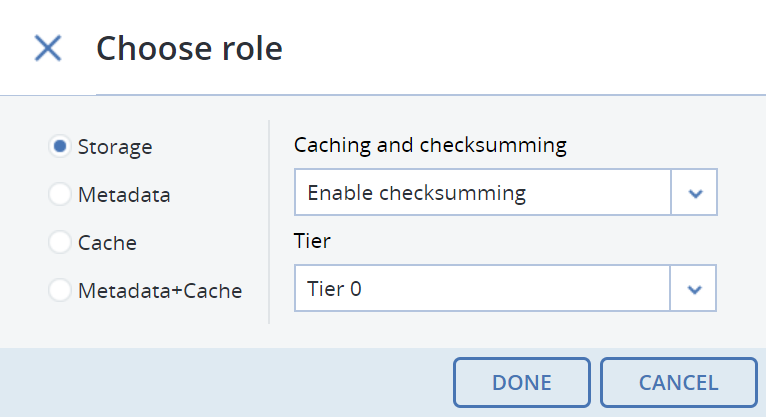
Storage. Use the disk to store chunks and run a chunk service on the node. From the Caching and checksumming drop-down list, select one of the following:
- Use SSD for caching and checksumming. Available and recommended only for nodes with SSDs.
- Enable checksumming (default). Recommended for cold data, as it provides better reliability.
- Disable checksumming. Recommended for hot data, as it provides better performance.
Data caching improves cluster performance by placing frequently accessed data on an SSD.
Data checksumming generates checksums each time some data in the cluster is modified. When this data is then read, a new checksum is computed and compared with the old checksum. If the two are not identical, a read operation is performed again, thus providing better data reliability and integrity.
If a node has an SSD, it will be automatically configured to keep checksums when you add a node to a cluster. This is the recommended setup. However, if a node does not have an SSD drive, checksums will be stored on a rotational disk by default. It means that this disk will have to handle double the I/O, because for each data read/write operation there will be a corresponding checksum read/write operation. For this reason, you may want to disable checksumming on nodes without SSDs to gain performance at the expense of checksums. This can be especially useful for hot data storage.
To add an SSD to a node that is already in the cluster (or replace a broken SSD), you will need to release the node from the cluster, attach the SSD, choose to join the node to the cluster again, and, while doing so, select Use SSD for caching and checksumming for each disk with the role Storage.
With the Storage role, you can also select a tier from the Tier drop-down list. To make better use of data redundancy, do not assign all of the disks on a node to the same tier. Instead, make sure that each tier is evenly distributed across the cluster with only one disk per node assigned to it. For more information, refer to Understanding storage tiers.
Note
If the disk contains old data that was not placed there by Acronis Cyber Infrastructure, the disk will not be considered suitable for use in Acronis Cyber Infrastructure.
Metadata. Use the disk to store metadata and run a metadata service on the node. It is recommended to have only one metadata service per node.
Cache. Use the disk to store the write cache. This role is only for SSDs. To cache a specific storage tier, select it from the drop-down list. Otherwise, all tiers will be cached.
Metadata+Cache. A combination of the two roles described above.
Unassigned. Remove the roles from the disk.
Take note of the following:
- If a physical server has a system disk with the capacity greater than 100 GB, that disk can be additionally assigned the Metadata or Storage role. In this case, a physical server can have at least two disks.
- It is recommended to assign the System+Metadata role to an SSD. Assigning both of these roles to an HDD will result in mediocre performance suitable only for cold data (for example, archiving).
- The System role cannot be combined with the Cache and Metadata+Cache roles. The reason is that the I/O generated by the operating system and applications would contend with the I/O generated by journaling, thus negating its performance benefits.
- If you need to change the Metadata, Cache, or Metadata+Cache role later, assign the same role to a new disk first, and then release the old one.
Click Done.
Repeat steps 1 to 3 for every disk you want to be used in the storage cluster.
Click Done. On the Configuration summary screen, check the number of disks per each configuration category.
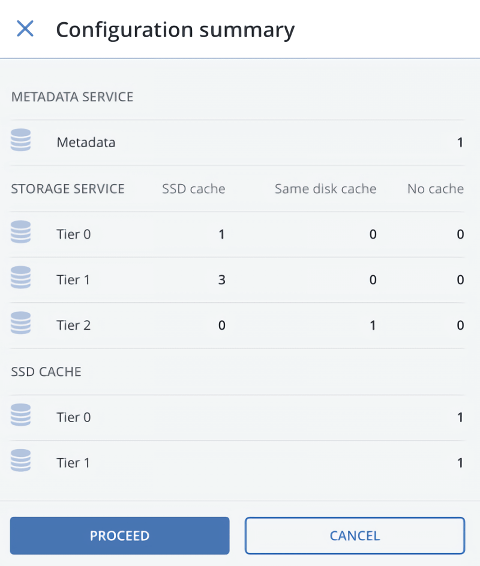
Click Join. You can monitor disk configuration progress on the Infrastructure > Nodes screen.