5.3. Managing compute nodes
To make your infrastructure more resilient and redundant, you can create a high availability configuration of three nodes.
Management node high availability (HA) and the compute cluster are tightly coupled, so changing nodes in one usually affects the other. Take note of the following:
- Each node in the HA configuration must meet the requirements for the management node, listed in the Hardware requirements. If the compute cluster is to be created, its hardware requirements must be added as well.
- If the HA configuration has been created before the compute cluster, all nodes in it will be added to the compute cluster.
- If the compute cluster has been created before the HA configuration, only nodes in the compute cluster can be added to the HA configuration. For this reason, to add a node to the HA configuration, add it to the compute cluster first.
- If both the HA configuration and compute cluster include the same three nodes, single nodes cannot be removed from the compute cluster. In such a case, the compute cluster can be destroyed completely, but the HA configuration will remain. This is also true vice versa, the HA configuration can be deleted, but the compute cluster will continue working.
Note
The compute cluster must have at least three nodes, to allow self-service users to enable high availability for Kubernetes master nodes.
Nodes in the compute cluster are shown on the Nodes screen.
You can see the following information about a node by clicking it:
The node’s virtual CPU and RAM reservations:
- Reserved for the system and storage services
- Provisioned to virtual machines located on the node
- Free virtual CPUs and RAM left on the node
Note
The number of virtual CPUs is a product of the number of physical CPUs on a node and the overcommitment ratio. To learn more about physical CPU reservations for system and storage services, refer to Hardware requirements .
The node name and ID, status, IP address, and placements, if any.
Hosted virtual machines and their resource consumption.
The next subsections describe how to add nodes to, and remove nodes from, the compute cluster.
5.3.1. Adding nodes to the compute cluster
Note
Before changing nodes in the compute cluster, refer to limitations in Managing compute nodes.
To add one or more nodes to your compute cluster, do the following:
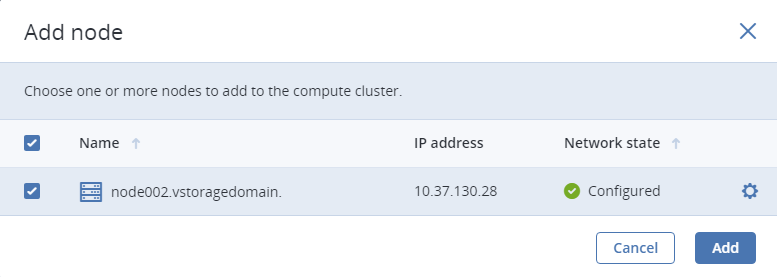
Click Add node on the Nodes screen. The Add node window will open.
If the network on each node is not marked green, configure it. To do this, click the cogwheel icon, assign networks with the compute-related traffic types to node NICs, and then click Apply.
Select nodes, and then click Add.
The added nodes will appear on the Nodes screen.
5.3.2. Releasing nodes from compute cluster
Note
Before changing nodes in the compute cluster, refer to limitations in Managing compute nodes.
To release one or more nodes from the compute cluster, do the following:
- On the Nodes screen, do one of the following:
- Select the nodes, and then click Release nodes above the list.
- Click the ellipsis icon next to a node and select Release.
- Click a node, and then click Release node on the node right pane.
- In the Release node window, confirm the action by clicking Release.
The selected nodes will disappear from the Nodes screen.
If the node to be released has VMs on it, they must be migrated to other nodes, first.