8.5. Creating the S3 cluster
To set up object storage services on a cluster node, do the following:
On the Infrastructure > Networks screen, make sure that the OSTOR private and S3 public traffic types are added to your networks.
In the left menu, click Storage services > S3.
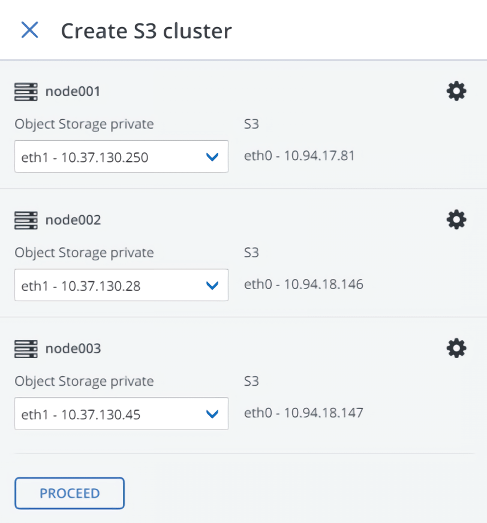
Select one or more nodes, and then click Create S3 cluster on the right pane. To create a highly available S3 cluster, select at least three nodes. It is also recommended to enable high availability for the management node prior to creating the S3 cluster. Refer to Enabling high availability for more details.
Note
The nodes are displayed with small icons representing their roles within a cluster. For more information on the icons, refer to https://kb.acronis.com/content/61024.
Make sure the correct network interface is selected in the drop-down list, and then click Proceed.
If necessary, click the cogwheel icon and configure the node’s network interfaces on the Network configuration screen.
On the Volume Parameters tab, select the desired tier, failure domain, and data redundancy mode. For more information, refer to Understanding storage tiers, Understanding failure domains, and Understanding data redundancy. Click Proceed.

For replication, you can change the redundancy scheme later. To do this, on the S3 > Nodes screen, click Settings on the right pane. For erasure coding, changing redundancy scheme is disabled, because it may decrease cluster performance. The reason is that re-encoding demands a significant amount of cluster resources for a long period of time. If you still want to change the redundancy scheme, please contact the technical support team.
Specify the external (publicly resolvable) DNS name for the S3 endpoint that will be used by the end users to access the object storage. For example,
s3.example.com. Click Proceed.Important
Configure your DNS server according to the example suggested in the admin panel.
Note
For complex environments, HAProxy might be used to build a scalable and redundant load balancing platform, which can be easily moved or migrated and is independent from Acronis Cyber Infrastructure. For more information, refer to https://kb.acronis.com/content/64787.
From the drop-down list, select an S3 endpoint protocol: HTTP, HTTPS or both.
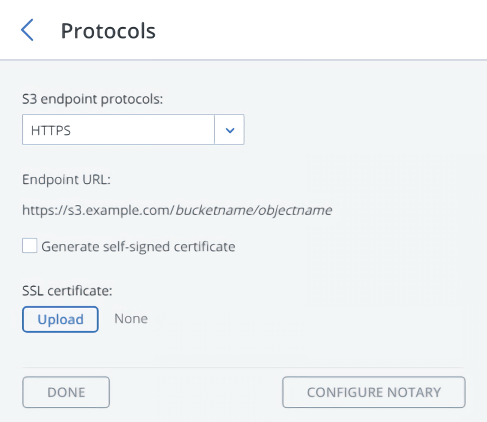
It is recommended to use only HTTPS for production deployments.
If you have selected HTTPS, do one of the following:
Check Generate self-signed certificate to get a self-signed certificate for HTTPS evaluation purposes.
Take note of the following:
- S3 geo-replication requires a certificate from a trusted authority. It does not work with self-signed certificates.
- To access the data in the S3 cluster via a browser, add the self-signed certificate to the browser’s exceptions.
Acquire a key and a trusted wildcard SSL certificate for the endpoint’s bottom-level domain. For example, the endpoint
s3.storage.example.comwould need a wildcard certificate for*.s3.storage.example.comwith the subject alternative names3.storage.example.com.If you acquired an SSL certificate from an intermediate certificate authority (CA), you should have an end-user certificate along with a CA bundle that contains the root and intermediate certificates. To be able to use these certificates, you need to merge them into a chain first. A certificate chain includes the end-user certificate, the certificates of intermediate CAs, and the certificate of a trusted root CA. In this case, an SSL certificate can only be trusted if every certificate in the chain is properly issued and valid.
For example, if you have an end-user certificate, two intermediate CA certificates, and a root CA certificate, create a new certificate file and add all certificates to it in the following order:
# End-user certificate issued by the intermediate CA 1
-----BEGIN CERTIFICATE-----
MIICiDCCAg2gAwIBAgIQNfwmXNmET8k9Jj1X<...>
-----END CERTIFICATE-----
# Intermediate CA 1 certificate issued by the intermediate CA 2
-----BEGIN CERTIFICATE-----
MIIEIDCCAwigAwIBAgIQNE7VVyDV7exJ9ON9<...>
-----END CERTIFICATE-----
# Intermediate CA 2 certificate issued by the root CA
-----BEGIN CERTIFICATE-----
MIIC8jCCAdqgAwIBAgICZngwDQYJKoZIhvcN<...>
-----END CERTIFICATE-----
# Root CA certificate
-----BEGIN CERTIFICATE-----
MIIDODCCAiCgAwIBAgIGIAYFFnACMA0GCSqG<...>
-----END CERTIFICATE-----
Upload the prepared certificate, and, depending on its type, do one of the following:
- Specify the passphrase (PKCS#12 files).
- Upload the SSL key.
Click Proceed.
You can change the protocol settings later. To do this, on the S3 > Nodes screen, click Protocol settings on the right pane.
If required, click Configure Notary, and then specify the Notary DNS name and Notary user key.
You can also change the protocol settings later. To do this, on the S3 > Nodes screen, click Notary settings on the right pane.
Click Done to create an S3 cluster.
After the S3 cluster is created, you can monitor its components on the S3 > Overview screen.
To check if the S3 cluster is successfully deployed and can be accessed by users, visit https://<S3_DNS_name> or http://<S3_DNS_name> in your browser. You should receive the following XML response:
<Error>
<Code>AccessDenied</Code>
<Message/>
</Error>
To start using the S3 storage, you will also need to create at least one S3 user.