4.5. Managing Images
Acronis Cyber Infrastructure allows you to upload ISO images and templates that can be used to create VM volumes. An ISO image is a typical OS distribution that needs to be installed on disk. In turn, a template is a ready volume in the QCOW2 format with an installed operating system and applications and a set minimum size. Many OS vendors offer templates of their operating systems under the name “cloud images”. For a list of guest OSes supported in virtual machines, see Supported Guest Operating Systems.
Note
Images are stored according to the default storage policy.
4.5.1. Uploading, Editing, and Removing Images
To add an image, do the following:
On the COMPUTE > Virtual machines > IMAGES tab, click Add image.
In the Add image window, do the following:
Click Browse and select a template or ISO file.
Specify an image name to be shown in the admin panel.
Select a correct OS type from the drop-down list.
Important
OS type affects VM parameters like hypervisor settings. VMs created from an image with a wrong OS type may not work correctly, e.g., crash.
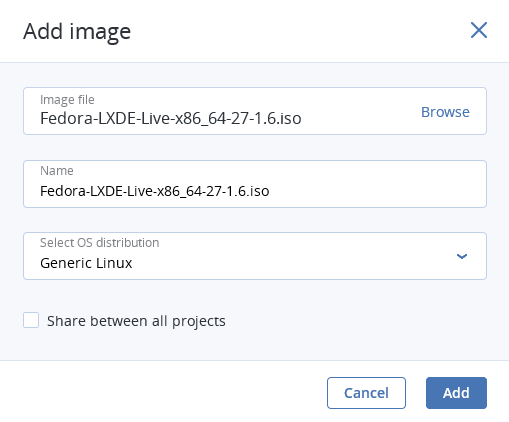
Optionally, select the Share between all projects checkbox. With the option disabled, the image will only be available in the admin project of the Default domain.
Click Add to upload the image.
The admin panel will show the upload progress.
Important
Do not reload the page while the image is being uploaded or the process will fail.
To edit an image, select it and click the pencil icon next to a parameter you need to change.
To remove an image, click the ellipsis button next to it and Delete.
4.5.2. Creating Volumes from Images
You can create volumes from both ISO images and templates. Do the following:
On the image panel, click Create volume.
In the Create volume window, specify the volume name, size, and choose a storage policy.
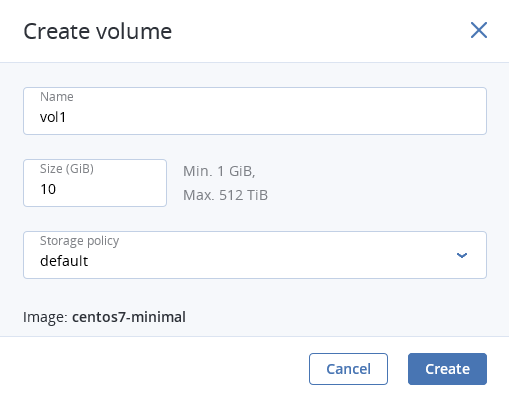
Click Create.
The new volume will appear on the COMPUTE > Storage > VOLUMES tab.
4.5.3. Mounting ISO Images to Virtual Machines
Note
This feature is supported only for Linux virtual machines. You can, however, mount an ISO image to a Windows VM via the vinfra tool. Use the insructions provided in Installing Guest Tools in Existing VMs. Replace the guest tools image in the examples with your image.
To mount an ISO image to a Linux VM, do as follows:
- Create a volume from the ISO image as described in Creating Volumes from Images.
- Attach the resulting volume to the desired VM as described in Attaching and Detaching Volumes.
The mounted disk will appear inside the Linux VM.
4.5.4. Preparing Templates
To be able to connect to a virtual machine via SSH or perform some of the initial configuration tasks, you need to prepare a VM template (or a boot volume for Windows VMs) before creating a VM from it. The steps you need to perform to prepare the VM template differ depending on the guest operating system and are described in the sections below.
4.5.4.1. Preparing Linux Templates
As all Linux guests have OpenSSH Server pre-installed by default, you only need to make sure a Linux template has cloud-init installed.
The easiest way to get a Linux template with cloud-init installed is to obtain it from its official repository or build one with the diskimage-builder tool. (For more information, refer to Creating Linux Templates.)
4.5.4.2. Preparing Windows Templates
Windows guests have neither Cloudbase-Init nor OpenSSH Server pre-installed by default. You need to install and configure them manually as follows:
Note
If you only need to configure Cloudbase-Init, skip step 4.
Create a VM from a Windows image as described in Creating Virtual Machines.
Log in to the VM and install the guest OS using the built-in VNC console.
Create a new administrator account that will be used for SSH connections and log in with it.
Install and configure OpenSSH Server as follows:
Run Windows PowerShell with administrator privileges and set the execution policy to unrestricted to be able to run scripts:
> Set-ExecutionPolicy Unrestricted
Download OpenSSH Server (for example, from the GitHub repository), extract the archive into the
C:\Program Filesdirectory, and install it by running:> & 'C:\Program Files\OpenSSH-Win64\install-sshd.ps1'
Start the
sshdservice and set its startup type to “Automatic”:> net start sshd > Set-Service sshd -StartupType Automatic
Open TCP port 22 for the OpenSSH service in the Windows Firewall:
on Windows 8.1, Windows Server 2012, and newer versions, run
> New-NetFirewallRule -Protocol TCP -LocalPort 22 -Direction Inbound \
-Action Allow -DisplayName OpenSSH
on Windows 7, Windows Server 2008, and Windows Server 2008 R2, run
> netsh advfirewall firewall add rule name=sshd dir=in action=allow \
protocol=TCP localport=22
Open the
C:\ProgramData\ssh\sshd_configfile:> notepad 'C:\ProgramData\ssh\sshd_config'
Comment out the following lines at the end of the file:
#Match Group administrators
#AuthorizedKeysFile __PROGRAMDATA__/ssh/administrators_authorized_keys
And save the changes.
Create the
.sshdirectory inC:\Users\<current_user>and an emptyauthorized_keysfile inside it:> cd C:\Users\<current_user> > mkdir .ssh > notepad .\.ssh\authorized_keys
Remove the
.txtextension from the created file:> move .\.ssh\authorized_keys.txt .\.ssh\authorized_keys
Modify the permissions for the created file to disable inheritance as follows:
> icacls .\.ssh\authorized_keys /inheritance:r
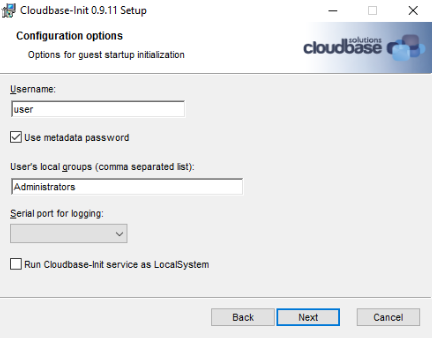
Download Cloudbase-Init (for example, from the official site), launch the installation, and follow the on-screen instructions:
In the Configuration options window, enter the current username in the Username field:
Important
The user account password will be reset on the next VM startup. You will be able to log in with this account using the key authentication method or you can set a new password with a customization script (see Creating Virtual Machines).
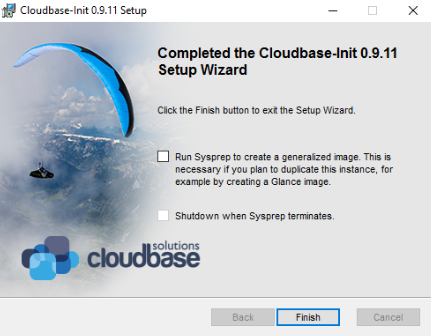
When the installation is complete, do not run Sysprep and click Finish:
Run Windows PowerShell with administrator privileges and open the file
C:\Program Files\Cloudbase Solutions\Cloudbase-Init\conf\cloudbase-init.conf:> notepad 'C:\Program Files\Cloudbase Solutions\Cloudbase-Init\conf\cloudbase-init.conf'
Add
metadata_servicesandpluginsin two lines:metadata_services=cloudbaseinit.metadata.services.configdrive.ConfigDriveService,\ cloudbaseinit.metadata.services.httpservice.HttpService plugins=cloudbaseinit.plugins.common.mtu.MTUPlugin,\ cloudbaseinit.plugins.windows.ntpclient.NTPClientPlugin,\ cloudbaseinit.plugins.common.sethostname.SetHostNamePlugin,\ cloudbaseinit.plugins.windows.createuser.CreateUserPlugin,\ cloudbaseinit.plugins.common.networkconfig.NetworkConfigPlugin,\ cloudbaseinit.plugins.windows.licensing.WindowsLicensingPlugin,\ cloudbaseinit.plugins.common.sshpublickeys.SetUserSSHPublicKeysPlugin,\ cloudbaseinit.plugins.windows.extendvolumes.ExtendVolumesPlugin,\ cloudbaseinit.plugins.common.setuserpassword.SetUserPasswordPlugin,\ cloudbaseinit.plugins.common.userdata.UserDataPlugin,\ cloudbaseinit.plugins.windows.winrmlistener.ConfigWinRMListenerPlugin,\ cloudbaseinit.plugins.windows.winrmcertificateauth.ConfigWinRMCertificateAuthPlugin,\ cloudbaseinit.plugins.common.localscripts.LocalScriptsPlugin
Note
Make sure to remove all backslashes in the lines above.
And save the changes.
Stop the VM.
After the VM shuts down, you can either
- delete it to make its boot volume available for creating new VMs, or
- convert the VM boot volume to a template (see Creating Images from Volumes).