Deploying the storage cluster
Create the storage cluster on one (the first) node, then populate it with more nodes.
Limitations
- You can use shingled magnetic recording (SMR) HDDs only with the Storage role and only if the node has an SSD disk with the Cache role.
Prerequisites
- A clear understanding of the storage cluster, which is explained in About the storage cluster.
- A clear understanding of the concept Storage tiers.
- Your infrastructure networks are set up, as described in Setting up networks.
- The node network interfaces are configured by following the instructions in Configuring node network interfaces.
- If supported, RDMA is enabled, as described in Enabling RDMA.
- External DNS servers are added automatically during the installation or manually, as described in Adding external DNS servers.
- All of the nodes are shown in the admin panel on the Infrastructure > Nodes screen with the Unassigned status.
To create the storage cluster on the first node
- Open the Infrastructure > Nodes screen, and then click Create storage cluster.
-
[Optional] To configure the disk roles or node location, click the cogwheel icon.
-
 To configure disks
- Select Disks.
- Select the required disk, and then click Configure.
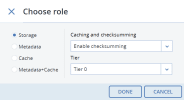
- On the Choose role screen, select a role:
If you want to use the disk to store chunks and run a storage service on the node, select Storage, and then select one of the following:
- Use SSD for caching and checksumming. Available and recommended only for nodes with SSDs.
- Enable checksumming (default). Recommended for nodes with HDDs as it provides better reliability.
- Disable checksumming. Not recommended for production. For an evaluation or testing environment, you can disable checksumming for nodes with HDDs, to provide better performance.
Then, select a tier. To make better use of data redundancy, do not assign all of the disks on a node to the same tier. Instead, make sure that each tier is evenly distributed across the cluster with only one disk per node assigned to it.
- If you want to use the disk to store metadata and run a metadata service on the node, select Metadata. It is recommended to have only one metadata service per node.
- [Only for SSD drives] If you want to use the disk to store the write cache, select Cache. To cache a specific storage tier, select it from the list. Otherwise, all tiers will be cached.
- [Only for SSD drives] If you want to use the disk to store both metadata and the write cache, select Metadata+Cache.
- Repeat the previous steps for every disk you want to be used in the storage cluster, and click Done.
-
On the Configuration summary screen, check the number of disks per each configuration category.
-
 To configure node location
By default, the nodes are added to the Default rack in the Default row in the Default room.
-
Select Location.
-
To create a room, click Create room in the Move nodes window. Specify the room name, and then click Create.
- To add a new row, click the created room. Click Create row, enter a name for it, and then click Create.
- To add a new rack, click the created row. Click Create rack, enter a name for it, and then click Create.
- Click the created rack, and then click Move.
-
-
- Type a name for the cluster. It may only contain Latin letters (a-z, A-Z), numbers (0-9), and hyphens (“-“).
- Enable encryption, if required.
- Click Create.
You can monitor cluster creation on the Infrastructure > Nodes screen. The creation might take some time, depending on the number of disks to be configured. Once the configuration is complete, the cluster is created.
To add nodes to the cluster
- On the Infrastructure > Nodes screen, click an unassigned node.
- On the node right pane, click Join to cluster.
- Click Join to assign the roles to disks automatically and add the node to the default location. Alternatively, click the cogwheel icon to configure the disk roles or node location.

