Creating compute networks
Limitations
- You can create only one untagged physical network over an infrastructure network.
Prerequisites
- A clear understanding of the compute network types and architecture, which are explained in Compute network types and Compute network architecture.
To add a compute network
-
On the Compute > Network > Networks tab, click Create network.
-
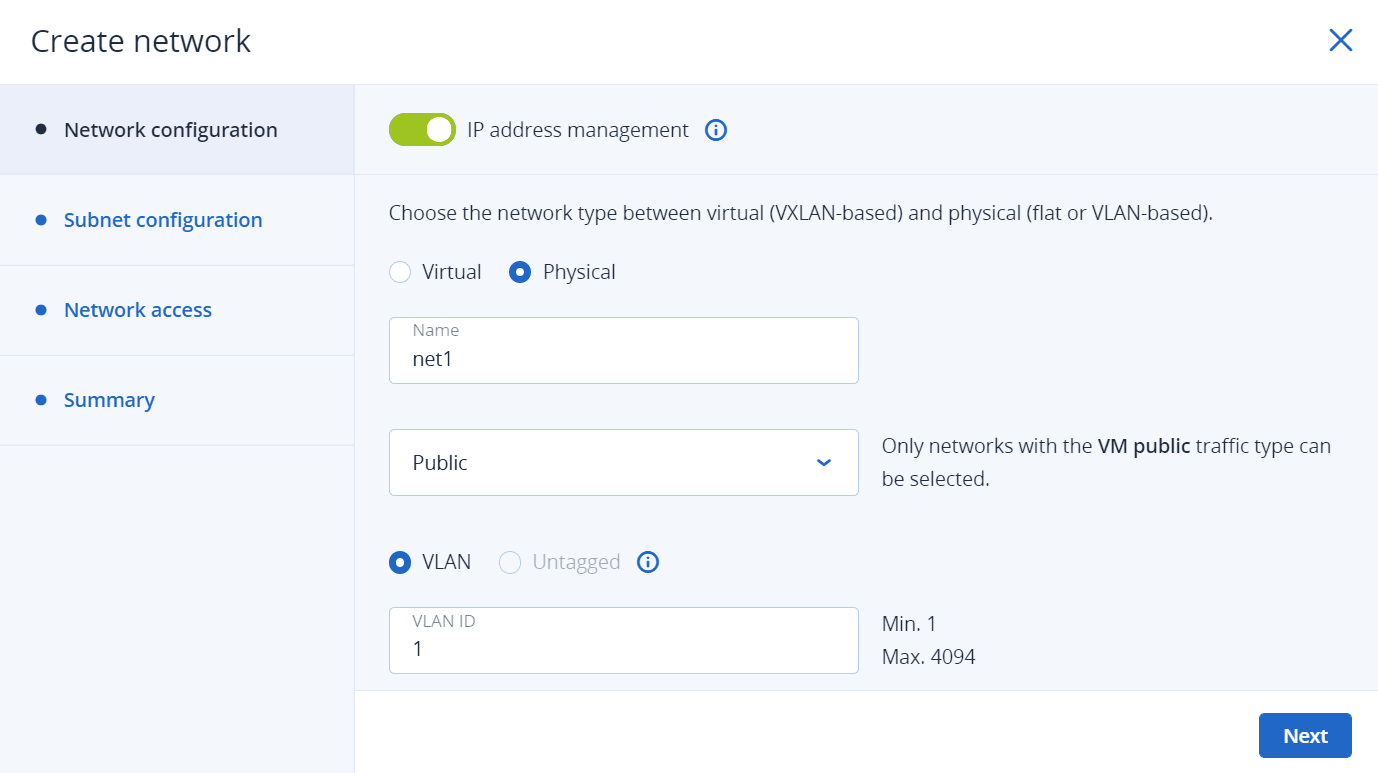
On the Network configuration step:
-
Enable or disable IP address management:
- With IP address management enabled, VMs connected to the network will automatically be assigned IP addresses from allocation pools by the built-in DHCP server and use custom DNS servers. Additionally, spoofing protection will be enabled for all VM network ports by default. Each VM network interface will be able to accept and send IP packets only if it has IP and MAC addresses assigned. You can disable spoofing protection manually for a VM interface, if required.
- With IP address management disabled, VMs connected to the network will obtain IP addresses from the DHCP servers in that network, if any. Also, spoofing protection will be disabled for all VM network ports, and you cannot enable it manually. This means that each VM network interface, with or without assigned IP and MAC addresses, will be able to accept and send IP packets.
In any case, you will be able to manually assign static IP addresses from inside the VMs.
-
Select the network type: virtual (VXLAN-based) or physical (flat or VLAN-based).
-
Provide the network details, depending on the type:
-
For a virtual network, specify a name.
-
For a physical network, specify a name and select an infrastructure network with the VM public traffic type. Then, select VLAN and specify a VLAN ID to create a VLAN-based network, or select Untagged to create a flat physical network.
-
-
Click Next.

-
-
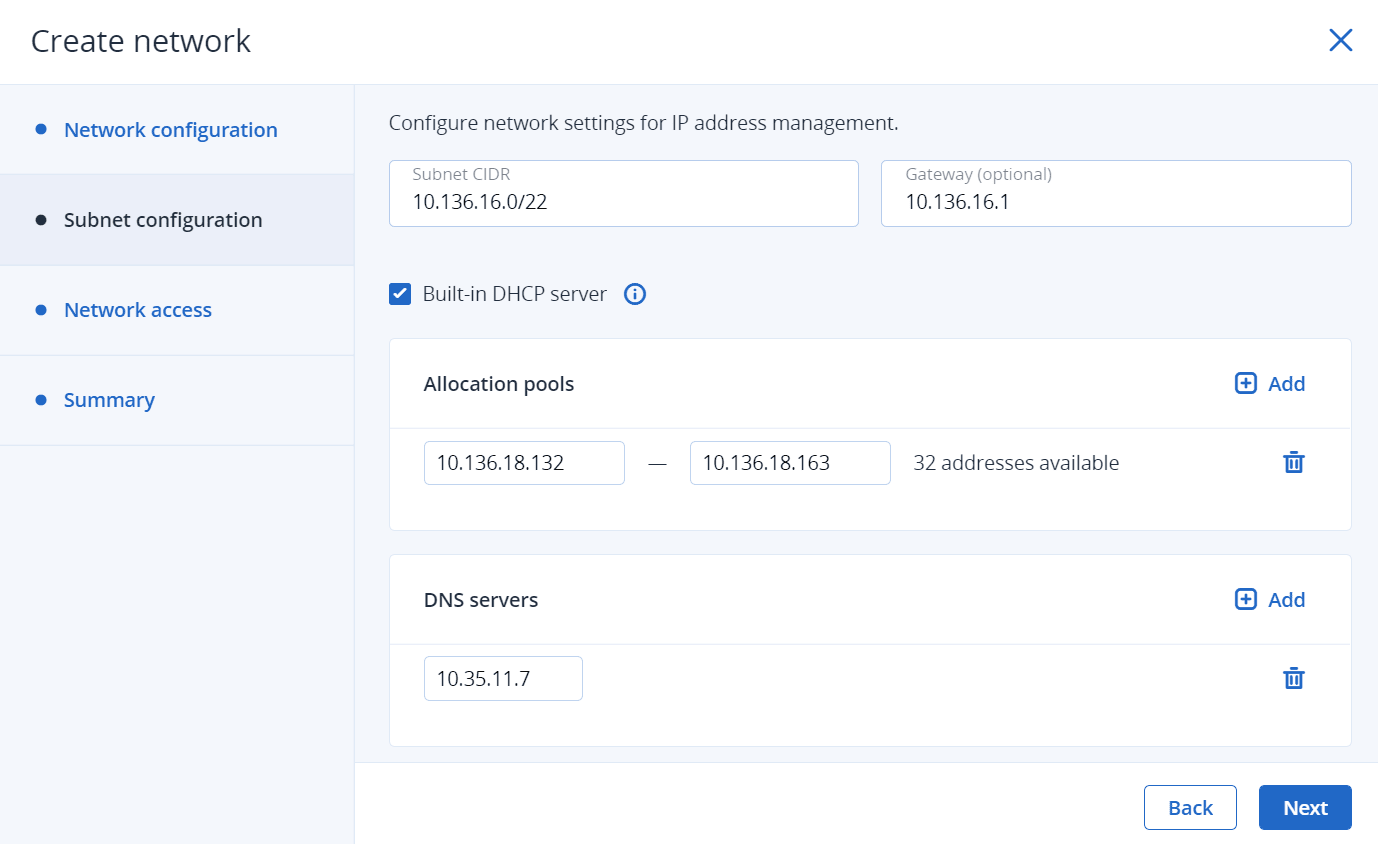
If you enabled IP address management, you will move on to the Subnet configuration step, where you can configure the network settings for IP address management:
- Specify the network’s IPv4 address range and, optionally, specify a gateway. If you leave the Gateway field blank, the gateway will be omitted from network settings.
-
Enable or disable the built-in DHCP server:
- With the DHCP server enabled, VM network interfaces will automatically be assigned IP addresses: either from allocation pools or, if there are no pools, from the network’s entire IP range.
- With the DHCP server disabled, VM network interfaces will still get IP addresses, but you will have to manually assign them inside VMs.
The virtual DHCP service will work only within the current network and will not be exposed to other networks.
-
Specify one or more allocation pools (ranges of IP addresses that will be automatically assigned to VMs).
-
Specify DNS servers that will be used by virtual machines. These servers can be delivered to VMs via the built-in DHCP server or by using the cloud-init network configuration (if cloud-init is installed in the VM).
-
Click Next.
-
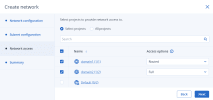
If you selected to create a physical network, you will move on to the Network access step, where you can configure the network access:
-
Select projects to provide network access to:
- If you want the network to be accessed from all existing and new projects, select All projects.
- If you want the network to be accessed from all projects within a domain, select Select projects, and then select the check box next to the required domain.
- If you want the network to be accessed from a particular project within a domain, select Select projects, click the domain name, and then select the required project.
- If you do not want to share the network, skip this step by clicking Next.
-
Select the access type:
- By providing full access, you allow virtual machines in the selected projects to communicate with this network either directly or via virtual routers.
- By providing routed access, you allow virtual machines in the selected projects to communicate with this network only via virtual routers.
You can also provide direct access, which implies a direct connection of virtual machines within projects to a physical network. Direct access can be granted only via the
vinfratool by specifyingdirectin the--rbac-policiesoption (refer to "vinfra service compute network create" in the Administrator Command Line Guide). You cannot configure this access type in the admin panel. -
Click Next.
-
-
On the Summary step, review the configuration, and then click Add network.