4.5. Managing Virtual Routers
Virtual routers provide L3 services such as routing and Source Network Address Translation (SNAT) between private and public networks or different private networks:
- a virtual router between private and public networks provides access to public networks, such as the Internet, for VMs connected to this private network;
- a virtual router between different private networks provides network communication for VMs connected to these private networks.
A virtual router has two types of ports:
- an external gateway that is connected to a public network,
- an internal port that is connected to a private network.
Note
A router can only connect networks with enabled IP management.
To create a virtual router, do the following:
On the COMPUTE > Networks > NETWORKS tab, make sure the virtual networks that are to be connected to a router have a gateway specified.
Navigate to the COMPUTE > Routers tab and click Add router.
In the Add router window:
- Specify a router name.
- From the Network drop-down menu, select a public network through which external access will be provided via an external gateway. The new external gateway will pick an unused IP address from the selected public network.
- In the Add internal interfaces section, select one or more private networks to connect to a router via internal interfaces. The new internal interfaces will attempt to use the gateway IP address of the selected private networks by default.
- Optionally, select or deselect the SNAT checkbox to enable or disable SNAT, respectively, on the external gateway of the router. With SNAT enabled, the router replaces VM private IP addresses with the public IP address of its external gateway.
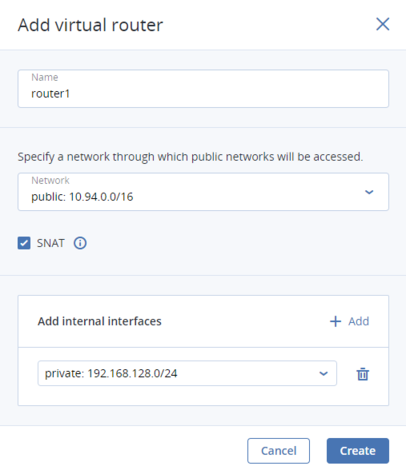
Click Create.
To edit a router name, click the ellipsis icon next to it and Rename.
To remove a virtual router, click the ellipsis icon next to it and Delete. To remove multiple virtual networks at once, select them and click Delete. Before deleting a virtual router, make sure no floating IP addresses are associated with any network it is connected to.
4.5.1. Managing Router Interfaces
You can add an external router interface as follows:
Note
To change an external gateway, remove the existing one first.
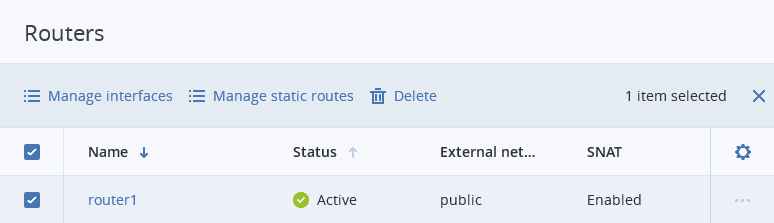
On Routers screen, click the router name to open the list of its interfaces.
Click Add.
In the Add interface window, do the following:
- Choose External gateway.
- From the Network drop-down menu, select a public network to connect to the router. The new interface will pick an unused IP address from the selected public network. You can also provide a specific IP address from the selected public network to assign to the interface in the IP address field.
- Optionally, select or deselect the SNAT checkbox to enable or disable SNAT, respectively, on the external gateway of the router. With SNAT enabled, the router replaces VM private IP addresses with the public IP address of its external gateway.
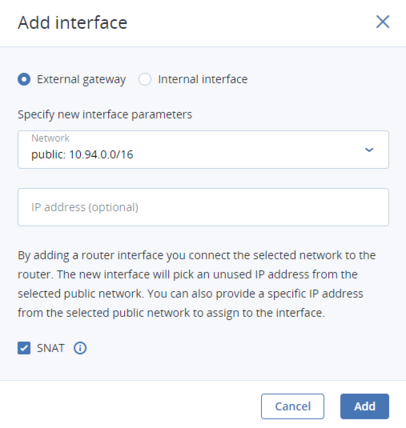
Click Add.
To edit the external gateway parameters, click the ellipsis icon next to it and Edit. In the Edit interface window, you can change the external gateway IP address and enable or disable SNAT on it. To save your changes, click Save.
You can add an internal router interface as follows:
On Routers screen, click the router name to open the list of its interfaces.
Click Add.
In the Add interface window, select a network to connect to the router from the Network drop-down menu. The new interface will attempt to use the gateway IP address of the selected private network by default. If it is in use, specify an unused IP address from the selected private network to assign to the interface in the IP address field.
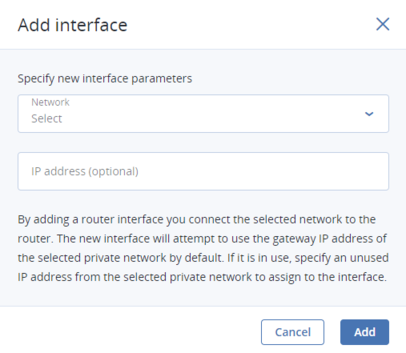
Click Add.
To remove a router interface, click the ellipsis icon next to it and Delete. To remove multiple interfaces at once, select them and click Delete.
4.5.2. Managing Static Routes
You can also configure static routes of a router by manually adding entries into its routing table. This can be useful, for example, if you do not need a mutual connection between two private networks and want only one private network to be accessible from the other.
Consider the following example:
- the virtual machine
vm1is connected to the private networkprivate1(192.168.128.0/24) via the network interface with IP address192.168.128.10, - the virtual machine
vm2is connected to the private networkprivate2(192.168.30.0/24) via the network interface with IP address192.168.30.10, - the router
router1connects the networkprivate1to the public network via the external gateway with the IP address10.94.129.73, - the router
router2connects the networkprivate2to the public network via the external gateway with the IP address10.94.129.74.
To be able to access vm2 from vm1, you need to add a static route for router1, specifying the CIDR of private2, that is 192.168.30.0/24, as the destination subnet and the external gateway IP address of router2, that is 10.94.129.74, as the next hop IP address. In this case, when an IP packet for 192.168.30.10 reaches router1, it will be forwarded to router2 and then to vm2.
To create a static route for a router, do the following:
On the Routers screen, select router’s checkbox and click Manage static routes above.
On the next screen, click Add static route.
In the Add static route window, specify the destination subnet range and mask in CIDR notation and the next hop’s IP address. The next hop’s IP address must belong to one of the networks that the router is connected to.
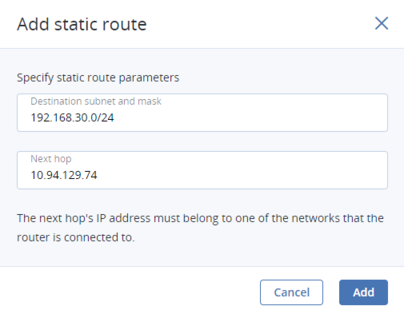
Click Add.
To edit a static route, click the ellipsis icon next to it and Edit. In the Edit static route window, change the desired parameters and click Save.
To remove a static route, click the ellipsis icon next to it and Delete. To remove multiple routes at once, select them and click Delete.