4.3. Connecting to Public Cloud Storage via Backup Gateway
With Backup Gateway, you can have Acronis Backup Cloud or Acronis Backup Advanced store backups in a number of public clouds and on-premises object storage solutions:
- Amazon S3
- IBM Cloud
- Alibaba Cloud
- IIJ
- Cleversafe
- Cloudian
- Microsoft Azure
- Swift object storage
- Softlayer (Swift)
- Google Cloud Platform
- Wasabi
- Other solutions using S3
However, compared to the local storage cluster, storing backup data in a public cloud increases the latency of all I/O requests to backups and reduces performance. For this reason, it is recommended to use the local storage cluster as storage backend.
Backups are cold data with a specific access pattern: the data is not accessed frequently but is expected to be available immediately when accessed. For this use case, it is cost-efficient to choose storage classes intended for long-term storage with infrequently accessed data. The recommended storage classes include the following:
- Infrequent Access for Amazon S3
- Cool Blob Storage for Microsoft Azure
- Nearline and Coldline storage for Google Cloud Platform
Archive storage classes like Amazon S3 Glacier, Azure Archive Blob, or Google Archive cannot be used for backup because they do not provide instant access to data. High access latency (several hours) makes it technically impossible to browse archives, restore data fast, and create incremental backups. Even though the archive storage is usually very cost-efficient, keep in mind that there are a number of different cost factors. In fact, the total cost of public cloud storage consists of payments for storing data, operations, traffic, data retrieval, early deletion and so on. For example, an archive storage service can charge six months’ storage payment for just one data recall operation. If the storage data is expected to be accessed more frequently, the added costs increase significantly the total cost of data storage. In order to avoid the low data retrieval rate and to cut expenses, we recommend using Acronis Cyber Cloud for storing backup data.
4.3.1. Important Requirements and Restrictions
- When working with public clouds, Backup Gateway uses the local storage as the staging area as well as to keep service information. It means that the data to be uploaded to a public cloud is first stored locally and only then sent to the destination. For this reason, it is vital that the local storage is persistent and redundant so the data does not get lost. There are multiple ways to ensure the persistence and redundancy of local storage. You can deploy Backup Gateway on multiple cluster nodes and select a good redundancy mode. If Acronis Cyber Infrastructure with the gateway is deployed on a single physical node, you can make the local storage redundant by replicating it among local disks. If Acronis Cyber Infrastructure with the gateway is deployed in a virtual machine, make sure it is made redundant by the virtualization solution it runs on.
- Make sure the local storage cluster has plenty of logical space for staging. For example, if you perform backup daily, provide enough space for at least 1.5 days’ worth of backups. If the daily backup total is 2TB, provide at least 3TB of logical space. The required raw storage will vary depending on the encoding mode: 9TB (3TB per node) in the 1+2 mode, 5TB (1TB per node) in the 3+2 mode, etc.
- If you are to store backups in an Amazon S3 cloud, keep in mind that Backup Gateway may sometimes block access to such backups due to the eventual consistency of Amazon S3. It means that Amazon S3 may occasionally return stale data as it needs time to render the most recent version of the data accessible. Backup Gateway detects such delays and protects backup integrity by blocking access until the cloud updates.
- Use a separate object container for each Backup Gateway cluster.
4.3.2. Setting Up Backup Gateway
Before you proceed, make sure that the destination storage has enough space for backups.
To set up Backup Gateway, do the following:
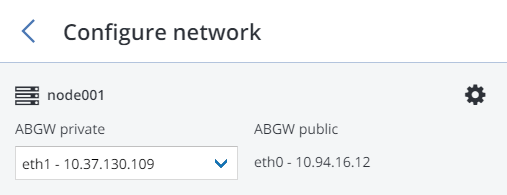
On the INFRASTRUCTURE > Networks screen, make sure that the ABGW private and ABGW public traffic types are added to the networks you intend to use.
In the left menu, click STORAGE SERVICES > Backup storage.
Select the node(s) to run the gateway services on and click Create gateway in the right menu.
Select Public Cloud as storage type.
Make sure the correct network interface is selected in the drop-down list. Click NEXT.
If necessary, click the cogwheel icon and configure node’s network interfaces on the Network Configuration screen.
On the Public cloud parameters pane, do the following:
Select a public cloud provider. If your provider is S3 compatible but not in the list, try AuthV2 compatible (S3) or AuthV4 compatible (S3).
Depending on the provider, specify Region, Authentication (keystone) URL, or Endpoint URL.
In case of Swift object storage, specify the authentication protocol version and attributes required by it.
Specify user credentials. In case of Google Cloud, select a JSON file with keys to upload.
Specify the folder (bucket, container) to store backups in. The folder must be writeable.
Use a separate object container for each Backup Gateway cluster.
Click NEXT.
On the Register in backup software pane, specify the following information for your Acronis product:
Important
Make sure that two-factor authentication (2FA) is disabled for your partner account. You can also disable it for a specific user within a 2FA-enabled tenant as described in Acronis Cyber Cloud documentation and specify the user credentials.
- In Address, specify the address of the Acronis Backup Cloud management portal (e.g., https://cloud.acronis.com/) or the hostname/IP address and port of the Acronis Backup Advanced management server (e.g., http://192.168.1.2:9877).
- In Account, specify the credentials of a partner account in the cloud or of an organization administrator on the local management server.
Finally, click DONE.