3.2. Deploying Object Storage
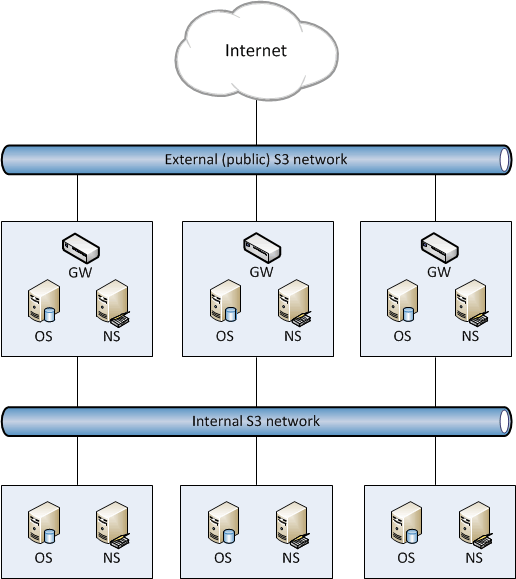
This chapter describes how to deploy object storage on top of a ready Acronis Storage cluster and create a setup like the one shown on the figure below. Note that not all cluster nodes have to run object storage services. The choice should be based on workload and hardware configurations.
To set up object storage services, do the following:
Plan the S3 network. Like a storage cluster, an S3 cluster needs two networks:
- An internal network in which NS, OS, and GW will interact. These services will generate traffic similar in amount to the total (incoming and outgoing) S3 user traffic. If this is not going to be much, it is reasonable to use the same internal network for both object storage and Acronis Storage. If, however, you expect that object storage traffic will compete with Acronis Storage traffic, it is reasonable to have S3 traffic go through the user data network (i.e. datacenter network). Once you choose a network for S3 traffic, you determine which IP addresses can be used while adding cluster nodes.
- An external (public) network through which end users will access the S3 storage. Standard HTTP and HTTPS ports must be open in this network.
An object storage cluster is almost completely independent on base block storage (like all access points, including virtual environments and iSCSI). Object and name servers keep their data in the Acronis Storage cluster in the same way as virtual environments, iSCSI, and other services do. So the OS and NS services depend on vstorage-mount (client) and can only work when the cluster is mounted. Unlike them, gateway is a stateless service that has no data. It is thus independent on vstorage-mount and can theoretically be run even on nodes where the Acronis Storage cluster is not mounted. However, for simplicity, we recommend creating gateways on nodes with object and name servers.
Object and name servers also utilize the standard high availability means of Acronis Storage (i.e. the shaman service). Like virtual environments and iSCSI, OS and NS are subscribed to HA cluster events. However, unlike other services, S3 cluster components cannot be managed (tracked and relocated between nodes) by shaman. Instead, this is done by the S3 configuration service that is subscribed to HA cluster events and notified by shaman whether nodes are healthy and can run services. For this reason, S3 cluster components are not shown in
shaman topoutput.Gateway services which are stateless are never relocated and their high availability is not managed by the Acronis Storage cluster. Instead, a new gateway service is created when necessary.
Make sure that each node that will run OS and NS services is in the high availability cluster. You can add nodes to HA cluster with the
shaman joincommand.Install the
vstorage-ostorpackage on each cluster node.# yum install vstorage-ostor
Create a cluster configuration on one of the cluster nodes where object storage services will run. It is recommended to create 10 NS and 10 OS services per each node. For example, if you are going to use five nodes, you will need 50 NS and 50 OS. Run this command on the first cluster node.
# ostor-ctl create -r /var/lib/ostor/configuration -n <IP_addr>
where
<IP_addr>is the node’s IP address (that belongs to the internal S3 network) that the configuration service will listen on.You will be asked to enter and confirm a password for the new object storage (it can be the same as your Acronis Storage cluster password). You will need this password to add new nodes.
The configuration service will store the cluster configuration locally in
/var/lib/ostor/configuration. In addition,<IP_addr>will be stored in/<storage_mount>/<ostor_dir>/control/name(<ostor_dir>is the directory in the cluster with object storage service files). If the first configuration service fails (and theostor-ctl get-configcommand stops working), replace the IP address in/<storage_mount>/<ostor_dir>/control/namewith that of a node running a healthy configuration service (created on the next step).Launch the configuration service.
# systemctl start ostor-cfgd.service
# systemctl enable ostor-cfgd.service
Initialize new object storage on the first node. The
<ostor_dir>directory will be created in the root of your cluster.# ostor-ctl init-storage -n <IP_addr> -s <cluster_mount_point>
You will need to provide the IP address and object storage password specified on step 3.
Add to the DNS public IP addresses of nodes that will run GW services. You can configure the DNS to enable access to your object storage via a hostname, and to have the S3 endpoint receive virtual hosted-style REST API requests with URIs like http://bucketname.s3.example.com/objectname.
After configuring DNS, make sure that DNS resolver for your S3 access point works from client machines.
Note
Only buckets with DNS-compatible names can be accessed with virtual hosted-style requests. For more details, see Bucket and Key Naming Policies.
Below is an example of a DNS zones configuration file for the BIND DNS server:
;$Id$
$TTL 1h  @  IN   SOA    ns.example.com. s3.example.com. (
                        2013052112      ; serial
                        1h      ; refresh
                        30m     ; retry
                        7d      ; expiration
                        1h )    ; minimum
                NS      ns.example.com.
$ORIGIN s3.example.com
h1 IN   A 10.29.1.95
        A 10.29.0.142
        A 10.29.0.137
* IN    CNAME    @
This configuration instructs the DNS to redirect all requests with URI http//.s3.example.com/ to one of the endpoints listed in resource record
h1(10.29.1.95, 10.29.0.142 or 10.29.0.137) in a cyclic (round-robin) manner.Add nodes where object storage services will run to the configuration. To do this run the
ostor-ctl add-hostcommand on every such node:# ostor-ctl add-host -r /var/lib/ostor/configuration --hostname <name> --roles OBJ
You will need to provide the object storage password set on step 3.
Create a new S3 volume with the desired number of NS and OS:
# ostor-ctl add-vol --type OBJ -s <cluster_mount_point> --os-count <OS_num> \
--ns-count <NS_num> --vstorage-attr "failure-domain=host,tier=0,replicas=3"
where
<NS_num>and<OS_num>are the numbers of NS and OS andfailure-domain=host,tier=0,replicas=3parameters set volume’s failure domain, tier, and redundancy mode (for more details, see the Installation Guide).
The command will return the ID for the created volume. You will need it on the next step.
Create S3 gateway instances on chosen nodes with Internet access and external IP addresses.
Note
For security reasons, make sure that only NGINX can access the external network and that S3 gateways only listen on internal IP addresses.
# ostor-ctl add-s3gw -a <internal_IP_address>:<port> -V <volume_ID>
where
<internal_IP_address>is the internal IP address of the node with the gateway,<port>(mandatory) is an unused port unique for each GW instance on the node, and<volume_ID>is the ID of the volume you created on the previous step (it can also be obtained fromostor-ctl get-config).
Launch object storage agent on each cluster node added to the object storage configuration.
# systemctl start ostor-agentd
# systemctl enable ostor-agentd
Make sure NS and OS services are bound to the nodes.
By default agents will try to assign NS and OS services to the nodes automatically in a round-robin manner. However, manual assignment is required if a new host has been added to the configuration, or if the current configuration is not optimized (for details, see Manually Binding Services to Nodes.
You can check the current binding configuration with the
ostor-ctl agent-statuscommand. For example:# ostor-ctl agent-status TYPE SVC_ID STATUS UPTIME HOST_ID ADDRS S3GW 8000000000000009 ACTIVE 527 fcbf5602197245da 127.0.0.1:9090 S3GW 8000000000000008 ACTIVE 536 4f0038db65274507 127.0.0.1:9090 S3GW 8000000000000007 ACTIVE 572 958e982fcc794e58 127.0.0.1:9090 OS 1000000000000005 ACTIVE 452 4f0038db65274507 10.30.29.124:39746 OS 1000000000000004 ACTIVE 647 fcbf5602197245da 10.30.27.69:56363 OS 1000000000000003 ACTIVE 452 4f0038db65274507 10.30.29.124:52831 NS 0800000000000002 ACTIVE 647 fcbf5602197245da 10.30.27.69:56463 NS 0800000000000001 ACTIVE 452 4f0038db65274507 10.30.29.124:53044 NS 0800000000000000 ACTIVE 647 fcbf5602197245da 10.30.27.69:37876
Install one NGINX web server per each S3 endpoint you need. On nodes where you install
nginx, replace the contents of its configuration file/etc/nginx/conf.d/nginx.confwith the following (replace the IP addresses as required):upstream s3 { server 127.0.0.1:9000; #S3 gateway 1 internal IP address server 127.0.0.2:9000; #S3 gateway 2 internal IP address server 127.0.0.3:9000; #S3 gateway 3 internal IP address # Optional load balancing parameters (see # http://nginx.org/en/docs/http/load_balancing.html) } server { listen 80; server_name 172.0.0.1; #S3 endpoint. If you have DNS configured, #replace the IP address with the corresponding hostname. client_max_body_size 5g; #charset koi8-r; #access_log /var/log/nginx/log/host.access.log main; location / { fastcgi_pass_header Connection-close; fastcgi_pass s3; fastcgi_no_cache 1; include fastcgi_params; fastcgi_request_buffering off; fastcgi_max_temp_file_size 0; }Launch NGINX:
# systemctl start nginx.service
# systemctl enable nginx.service
The object storage is deployed. Now you can add S3 users with the ostor-s3-admin tool. For example:
# ostor-s3-admin create-user -e user@email.com
Created user: email=user@email.com,user id=81d406fa613ad6c1
Key pair[0]: access key id=81d406fa613ad6c1S8HL,
secret access key=ya8iq3yrEYEhpErCkSmui6ifBghDDLdN2vso3sJn
The access key ID and secret access key pair, along with S3 endpoint, are required to connect to object storage from a client application.
To check that installation has been successful or just monitor object storage status, use the ostor-ctl get-config command. For example:
# ostor-ctl get-config
07-08-15 11:58:45.470 Use configuration service 'ostor'
SVC_ID             TYPE  URI
8000000000000006   S3GW  svc://1039c0dc90d64607/?address=127.0.0.1:9000
0800000000000000     NS  vstorage://cluster1/ostor/services/0800000000000000
1000000000000001     OS  vstorage://cluster1/ostor/services/1000000000000001
1000000000000002     OS  vstorage://cluster1/ostor/services/1000000000000002
1000000000000003     OS  vstorage://cluster1/ostor/services/1000000000000003
1000000000000004     OS  vstorage://cluster1/ostor/services/1000000000000004
8000000000000009   S3GW  svc://7a1789d20d9f4490/?address=127.0.0.1:9000
800000000000000c   S3GW  svc://7a1789d20d9f4490/?address=127.0.0.1:9090
3.2.1. Manually Binding Services to Nodes
You can manually bind services to nodes with the ostor-ctl bind command. You will need to specify the target node ID and one or more service IDs to bind to it. For example, the command:
# ostor-ctl bind -H 4f0038db65274507 -S 0800000000000001 \
-S 1000000000000003 -S 1000000000000005
binds services with IDs 800000000000001, 1000000000000003, and 1000000000000005 to a host with ID 4f0038db65274507.
A service can only be bound to a host that is connected to the shared storage which stores that service’s data. That is, the cluster name in service URI must match the cluster name in host URI.
For example, in a configuration with two shared storages stor1 and stor2 (see below) services with URIs starting with vstorage://stor1 can only be bound to hosts host510 and host511 while services with URIs starting with vstorage://stor2 can only be bound to hosts host512 and host513.
# ostor-ctl get-config
SVC_ID             TYPE  URI
0800000000000000     NS  vstorage://stor1/s3-data/services/0800000000000000
0800000000000001     NS  vstorage://stor1/s3-data/services/0800000000000001
0800000000000002     NS  vstorage://stor2/s3-data/services/0800000000000002
1000000000000003     OS  vstorage://stor1/s3-data/services/1000000000000003
1000000000000004     OS  vstorage://stor2/s3-data/services/1000000000000004
1000000000000005     OS  vstorage://stor1/s3-data/services/1000000000000005
HOST_ID            HOSTNAME      URI
0fcbf5602197245da  host510:2530  vstorage://stor1/s3-data
4f0038db65274507   host511:2530  vstorage://stor1/s3-data
958e982fcc794e58   host512:2530  vstorage://stor2/s3-data
953e976abc773451   host513:2530  vstorage://stor2/s3-data