Installing in the attended mode
Prerequisites
- A bootable USB drive, an IPMI virtual drive, or a PXE server is prepared, as described in Preparing the bootable media.
- The time is synchronized via NTP on all nodes in the same cluster and the nodes can access the NTP server.
-
If you want to change the default MTU, it must be configured on the network hardware.
To install in the attended mode
- Configure the server to boot from the chosen media.
- Boot the server and wait for the Welcome screen.
- On the Welcome screen, select Install Acronis Cyber Infrastructure.
- On Step 1, carefully read and accept the End-User License Agreement.
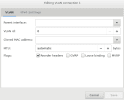
- On Step 2, configure the network:
Specify a unique host name: either a fully qualified domain name (<hostname>.<domainname>) or a short name (<hostname>).
The only way to change the host name later is by contacting the technical support.
- Configure your network cards. Usually the network is configured automatically (via DHCP). If manual configuration is required, select a network card, click Configure…, and specify the necessary parameters.
Set MTU on each network card. By default, MTU is set to 1500, while 9000 is recommended.
The MTU value must be the same across the entire network.
- If you are integrating Acronis Cyber Infrastructure into an existing network, adjust the MTU value to that of the network.
- If you are deploying Acronis Cyber Infrastructure from scratch alongside a new network, set the MTU value to the recommended 9000.
- [Optional] According to network recommendations, you may want to create bonded and virtual local area network (VLAN) interfaces for network security and better performance:
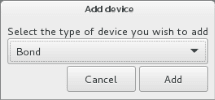
 Create bonded connections
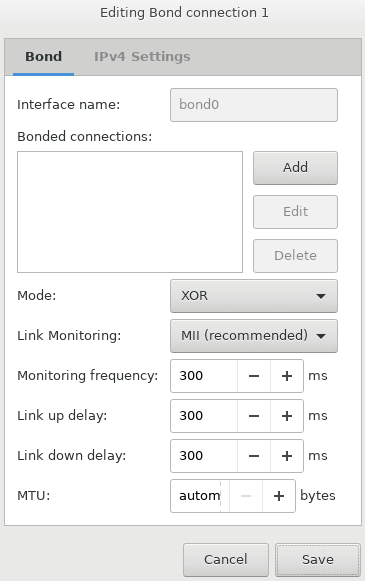
Bonded connections increase throughput beyond the capabilities of a single network card, as well as improve redundancy.
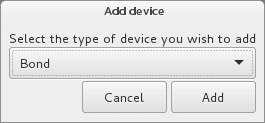
Click the plus button at the bottom of the screen, select Bond, and then click Add.
In the Editing Bond connection<N> window, set the following parameters for an Ethernet bonding interface:
- Mode to one required by your network
- Link Monitoring to
MII (recommended) - Monitoring frequency, Link up delay, and Link down delay to 300
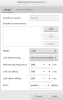
It is also recommended to manually set
xmit_hash_policytolayer3+4after the installation.- In the Bonded connections section on the Bond tab, click Add.
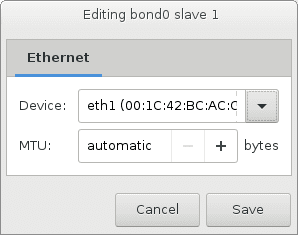
In the Editing bond<N> slave<N> window, select a network interface to bond in Device.
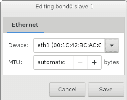
- Configure MTU, if required, and then click Save.
- Repeat steps 3 to 5 for each network interface you need to add to the bonded connection.
- Configure IPv4 settings, if required, and then click Save.
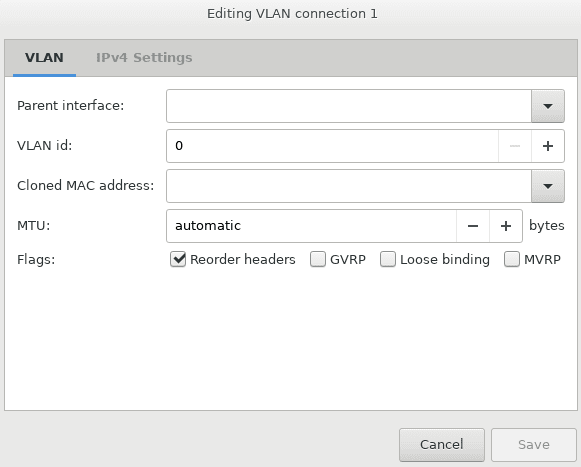
- Create VLAN interfaces
Click the plus button at the bottom of the screen, select VLAN, and then click Add.
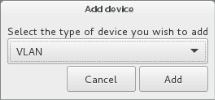
In the Editing VLAN connection<N> window:
- From the Parent interface drop-down list, select a physical adapter or bonded connection that the VLAN adapter will be based on.
- Specify a VLAN adapter identifier in the VLAN ID field. The value must be between 1 and 4094.
- Configure MTU and IPv4 settings, if required, and then click Save.
- On Step 3, select your time zone. The date and time will be set via NTP. You will need an Internet connection for synchronization to complete.
-
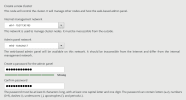
On Step 4, specify what type of node you are installing:
-
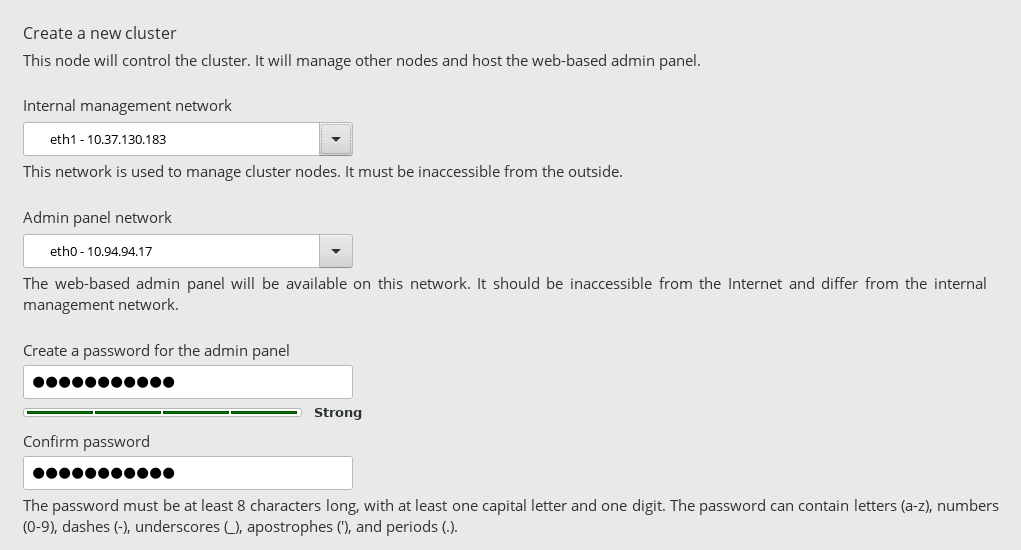
If you are installing on the primary node
The primary node, also called the management node, is the first node in the infrastructure. This node will host cluster management services and the admin panel. It will also serve as a storage node. Only one primary node is required.
- Select Yes, create a new cluster.
- In Internal management network, select a network interface for internal management and configuration purposes.
- In Admin panel network, select a network interface that will provide access to the admin panel.
- Create and confirm a password for the superadmin account of the admin panel.
-
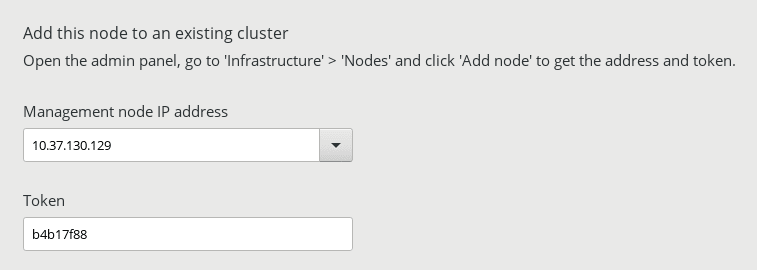
If you are installing on a secondary node
A secondary node is a node added to an already existing infrastructure. Such nodes will run services related to data storage and will be added to the infrastructure during installation.
- Select No, add it to an existing cluster.
-
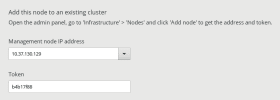
Obtain the token and management node address in the admin panel:
-
Log in to the admin panel on port 8888. The panel’s IP address is shown in the console after deploying the primary node. Use the default user name shown on the login screen and the primary node’s root password.
If prompted, add the security certificate to the browser’s exceptions.
- In the admin panel, open Infrastructure > Nodes, and then click Connect node to invoke a screen with the management node address and the token.
A single token can be used to deploy multiple secondary nodes in parallel. You can generate a new token, if needed. Generating a new token invalidates the old one.
-
-
On the installation screen, select the private IP address of the management node and enter the token.
- If you want to register the node in the admin panel manually after the installation, select Skip cluster configuration.
-
-
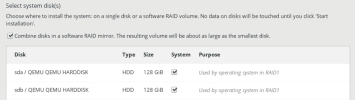
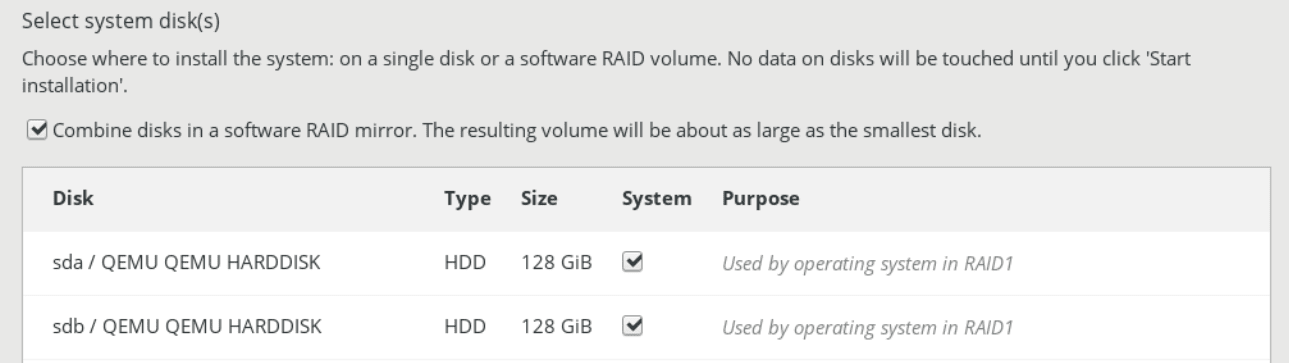
On Step 5, select a disk for the operating system. This disk will have the supplementary role System, although you will still be able to set it up for data storage in the admin panel.
All information on all disks recognized by the installer will be destroyed.
To ensure high performance and availability of the system disk, create a software RAID mirror for it.
Select the RAID check box, and then select at least two disks. It is recommended to create a RAID mirror from disks of the same size, as the volume equals the size of the smallest disk.
- On Step 6, enter and confirm the password for the root account, and then click Start installation.

Once the installation is complete, the node will reboot automatically. The admin panel IP address will be shown in the welcome prompt.
What's next
- After deploying the primary node, proceed to deploy the required amount of secondary nodes.
- When all the required nodes are displayed in the admin panel on the Infrastructure > Nodes screen as Unassigned, proceed to create the storage cluster, as outlined in Deployment and configuration.
- If you skipped cluster configuration on step 4 and want to add the unassigned node manually, refer to Re-adding unassigned nodes.