3.5. Step 2: Configuring the Network
Acronis Cyber Infrastructure requires one network interface per server for management. You will need to specify a network interface to which to assign the network with the Internal management traffic type. After installation, you will not be able to remove this traffic type from the preconfigured network in the admin panel.
On the Network and hostname screen, you need to have at least one network card configured. Usually the network is configured automatically (via DHCP). If manual configuration is required, select a network card, click Configure…, and specify the necessary parameters.
In particular, consider setting a better MTU value. As mentioned in Network Limitations, MTU is set to 1500 by default, while 9000 is recommended. If you are integrating Acronis Cyber Infrastructure into an existing network, adjust the MTU value to that of the network. If you are deploying Acronis Cyber Infrastructure from scratch alongside a new network, set the MTU value to the recommended 9000.
Important
The MTU value must be the same across the entire network.
You will need to configure the same MTU value on:
- Each router and switch on the network (consult your network equipment manuals)
- Each node’s network card as well as each bond or VLAN
It is also recommended to create two bonded connections as described in Planning Network and create three VLAN interfaces on one of the bonds. One of the VLAN interfaces must be created in the installer and assigned to the admin panel network so that you can access the admin panel after the installation. The remaining VLAN interfaces can be more conveniently created and assigned to networks in the admin panel as described in the Administrator’s Guide.
In addition, you need to provide a unique hostname, either a fully qualified domain name (<hostname>.<domainname>) or a short name (<hostname>), in the Host name field.
Having set up the network, click Next.
3.5.1. Creating Bonded Connections
Bonded connections offer increased throughput beyond the capabilities of a single network card as well as improved redundancy.
You can create network bonds on the Network and hostname screen as described below.
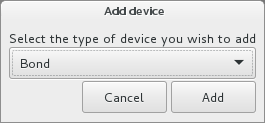
To add a new bonded connection, click the plus button in the bottom, select Bond from the drop-down list, and click Add.
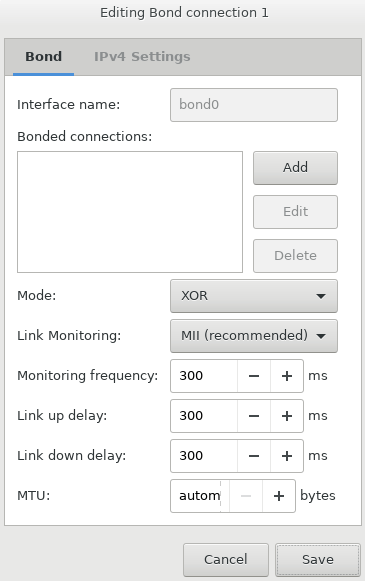
In the Editing Bond connection… window, set the following parameters for an Ethernet bonding interface:
- Mode to
XOR - Link Monitoring to
MII (recommended) - Monitoring frequency, Link up delay, and Link down delay to 300
Note
It is also recommended to manually set
xmit_hash_policytolayer3+4after the installation.- Mode to
In the Bonded connections section on the Bond tab, click Add.
In the Editing bond slave… window, select a network interface to bond from the Device drop-down list.
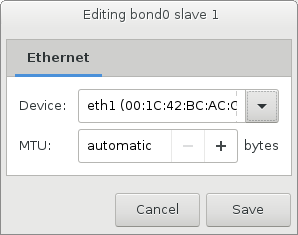
Configure MTU if required and click Save.
Repeat steps 3 to 5 for each network interface you need to add to the bonded connection.
Configure IPv4 settings if required and click Save.
The connection will appear in the list on the Network and hostname screen.
3.5.2. Creating VLAN Adapters
While installing Acronis Cyber Infrastructure, you can also create virtual local area network (VLAN) adapters on the basis of physical adapters or bonded connections on the Network and hostname screen as described below.
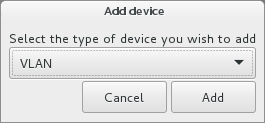
To add a new VLAN adapter, click the plus button in the bottom, select VLAN from the drop-down list, and click Add.
In the Editing VLAN connection… window:
- From the Parent interface drop-down list, select a physical adapter or bonded connection that the VLAN adapter will be based on.
- Specify a VLAN adapter identifier in the VLAN ID field. The value must be in the 1-4094 range.
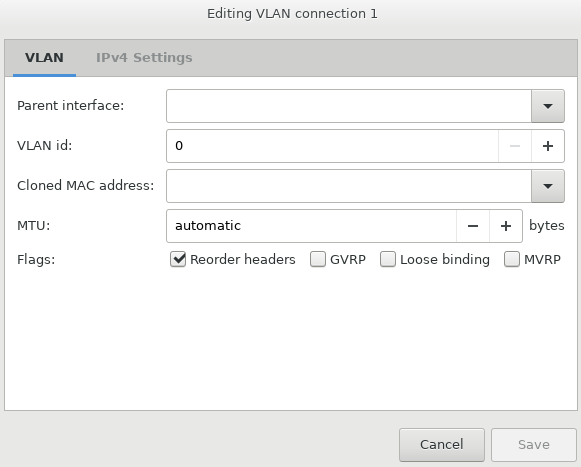
Configure IPv4 settings if required and click Save.
The VLAN adapter will appear in the list on the Network and hostname screen.