7.6. Creating SSH-Enabled Templates
To be able to connect to a virtual machine via SSH, you need to prepare a VM template (or a boot volume for Windows VMs) before creating a VM from it. The steps you need to perform to prepare the VM template differ depending on the guest operating system and are described in the sections below.
7.6.1. Creating SSH-Enabled Linux Templates
As all Linux guests have OpenSSH Server pre-installed by default, you only need to make sure a Linux template has cloud-init installed.
The easiest way to get a Linux template with cloud-init installed is to build one with the diskimage-builder tool. For more information, refer to Creating Linux Templates.
7.6.2. Creating SSH-Enabled Windows Templates
Windows guests have neither OpenSSH Server nor Cloudbase-Init pre-installed by default. You need to install and configure them manually as follows:
Upload the Windows distribution ISO image. For example:
# vinfra service compute image create windows10-image --os-distro win10 --file <path_to_image>
where
windows10-imageis the name of a new image.win10is the OS distribution. To list available distributions, runvinfra service compute show.
Create a VM from the ISO image. For example:
# vinfra service compute server create windows10-vm --flavor medium --network public \
--volume source=blank,size=64,boot-index=0,type=disk \
--volume source=image,id=windows10-image,size=5,boot-index=1,type=cdrom
Note
Round up the size of volumes to be created from images. E.g., if the OS distribution image is 4.9 GB, use size=5.
where
windows10-vmis the name of a new VM.- The first volume is a blank virtual HDD.
- The second volume is the OS distribution image
windows10-imageadded to the compute cluster in step 1. - The
boot-indexparameter is used to specify the correct boot order.
Log in to the VM and install the guest OS using the built-in VNC console.
Create a new administrator account that will be used for SSH connections and log in with it.
Important
You will be able to log in with this account only using the key authentication method.
Install and configure OpenSSH Server as follows:
Run Windows PowerShell with administrator privileges and set the execution policy to unrestricted to be able to run scripts:
> Set-ExecutionPolicy Unrestricted
Download OpenSSH Server (for example, from the GitHub repository), extract the ZIP archive into the
C:/Program Filesdirectory, and install it by running:> & 'C:/Program Files/OpenSSH-Win64/install-sshd.ps1'
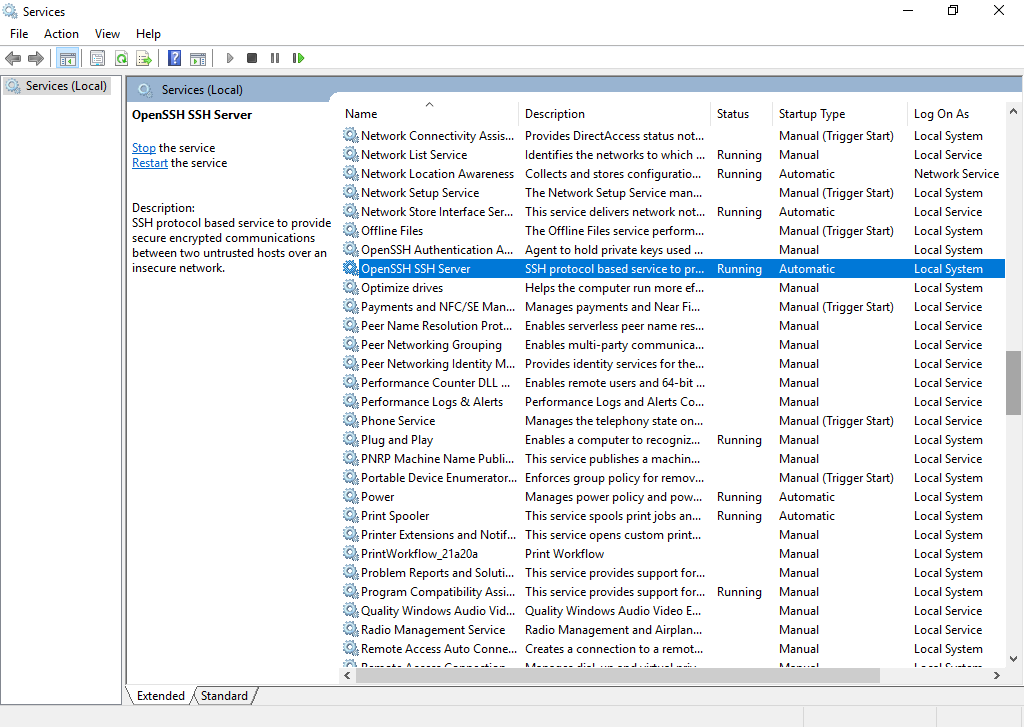
Start the OpenSSH SSH Server service in the Control Panel > System and Security > Administrative Tools > Services and set its startup type to Automatic:
Open TCP port 22 for the OpenSSH service in the Windows Firewall:
> New-NetFirewallRule -Protocol TCP -LocalPort 22 -Direction Inbound \
-Action Allow -DisplayName OpenSSH
Open the
C:\ProgramData\ssh\sshd_configfile:> notepad 'C:\ProgramData\ssh\sshd_config'
Comment out the following lines at the end of the file:
#Match Group administrators
#AuthorizedKeysFile __PROGRAMDATA__/ssh/administrators_authorized_keys
And save the changes.
Create the
.sshdirectory inC:\Users\<current_user>and an emptyauthorized_keysfile inside it:> cd C:\Users\<current_user> > mkdir .ssh > notepad .ssh\authorized_keys
The created file will have the
.txtextension. To remove it, run:> move .\.ssh\authorized_keys.txt .\.ssh\authorized_keys
Modify the permissions for the created file to disable inheritance as follows:
> icacls .ssh\authorized_keys /inheritance:r
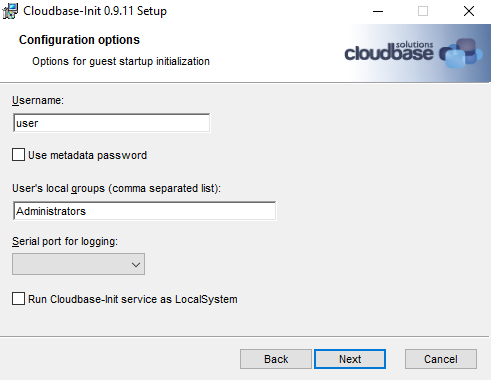
Download Cloudbase-Init (for example, from the official site) and launch the installation:
- In the Configuration options window, enter the name of the current user in the Username field and deselect the checkbox Use metadata password:
- When the installation is complete, select the following checkboxes:
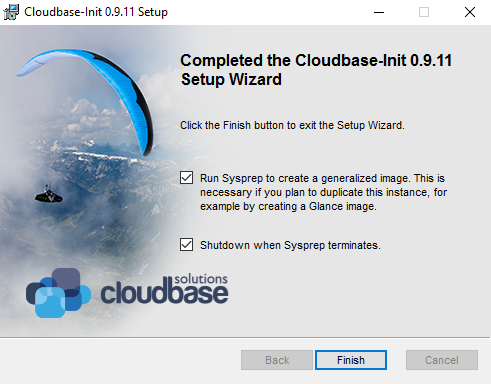
- Click Finish.
After the VM shuts down, you can either
- delete it to make its boot volume available for creating new VMs from it or
- convert the VM boot volume to a template (see the section “Creating Images from Volumes” in the Administrator’s Guide).