4.1. Deploying the Management Node
To register the management node and initialize its admin panel, run as the root user:
# echo '<passwd>' | /usr/libexec/vstorage-ui-backend/bin/configure-backend.sh \
-i <int_net> -x <ext_net>
# systemctl start vstorage-ui-backend
# systemctl start vstorage-ui-agent
# /usr/libexec/vstorage-ui-agent/bin/register-storage-node.sh -m <mn_IP>
Where
<passwd>is the desired administrator password;<int_net>is the internal (private) network interface;<ext_net>is the external (public) network interface; and<mn_IP>is the management node IP address.Reboot the virtual machine. The admin panel IP address will be shown in terminal’s welcome prompt. Now you can log in to the admin panel on port 8888. Use the
adminuser name and the management node’s root password that you provided in the previous step.In the admin panel, you will see the node you have deployed in the UNASSIGNED list on the INFRASTRUCTURE > Nodes screen.
On the INFRASTRUCTURE > Networks screen, click Edit. Make the Compute API traffic type available for the public network and click Save.
Now you need to create the storage cluster. Do the following:
Open the INFRASTRUCTURE > Nodes screen and click a node in the UNASSIGNED list.
On the node overview screen, click Create cluster.
In the Cluster field, type a name for the cluster. The name may only contain Latin letters (a-z, A-Z), numbers (0-9), underscores (“_”) and hyphens (“-“).
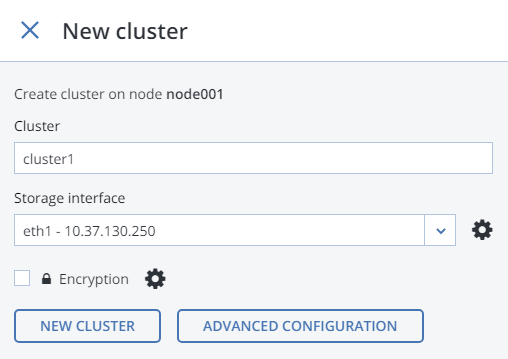
Click NEW CLUSTER.
The storage cluster is ready. You can now proceed to deploying secondary nodes if required by your scenario. If you only need a single node for the backup gateway, proceed to Connecting Acronis Backup Software to Storage Backends via Backup Gateway.