3.3. Creating the storage cluster
Now that you have created the management and secondary nodes and configured networking, you can proceed to create the storage cluster.
- Open the Infrastructure > Nodes screen, and then click Create storage cluster.
- (Optional) To configure the disk roles or node location, click the cogwheel icon.
- Type a name for the cluster. It may only contain Latin letters (a-z, A-Z), numbers (0-9), and hyphens (“-“).
- Enable encryption, if required.
- Click Create.
To add a secondary node, do the following:
On the Infrastructure > Nodes screen, click an unassigned node.
On the node right pane, click Join to cluster.
Click Join to have Acronis Cyber Infrastructure assign the roles to disks automatically and add the node to the default location. Alternatively, click the cogwheel icon to configure the disk roles or node location.
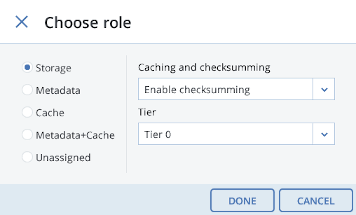
For the evaluation scenario, you need to assign a node’s storage disks to various tiers (refer to Understanding storage policies). For node 1, assign SSDs to tier 2. To do that, click the cogwheel icon in the Join to storage location window. Click Disks to view the list of drives on the node. Select one or more drives on the list, and then click Configure on the right. On the Choose role screen, select the required tier. In a similar way, assign SSDs to tier 2, and HDDs to tier 3 for nodes 2 and 3. For more information on disk roles, refer Creating the storage cluster.
You can monitor cluster creation on the Infrastructure > Nodes screen. The creation might take some time, depending on the number of disks to be configured. Once the automatic configuration is complete, the cluster is created.