Configuring new disks manually
Prerequisites
- The failed disk is released, as described in Releasing node disks, and the new disk for replacement is connected to the node.
To manually assign roles to a new disk
- On the Infrastructure > Nodes screen, click the name of the node to configure.
- Go to the Disks tab.
-
Select the unassigned disk and click Assign.
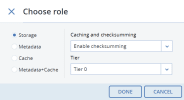
- On the Choose role screen, select a role:
If you want to use the disk to store chunks and run a storage service on the node, select Storage, and then select one of the following:
- Use SSD for caching and checksumming. Available and recommended only for nodes with SSDs.
- Enable checksumming (default). Recommended for nodes with HDDs as it provides better reliability.
- Disable checksumming. Not recommended for production. For an evaluation or testing environment, you can disable checksumming for nodes with HDDs, to provide better performance.
Then, select a tier. To make better use of data redundancy, do not assign all of the disks on a node to the same tier. Instead, make sure that each tier is evenly distributed across the cluster with only one disk per node assigned to it.
- If you want to use the disk to store metadata and run a metadata service on the node, select Metadata. It is recommended to have only one metadata service per node.
- (Only for SSD drives) If you want to use the disk to store the write cache, select Cache. To cache a specific storage tier, select it from the list. Otherwise, all tiers will be cached.
- (Only for SSD drives) If you want to use the disk to store both metadata and the write cache, select Metadata+Cache.
- Click Done.

