3.3. Creating the Storage Cluster
Now that you have created the management and secondary nodes and configured networking, you can proceed to create the storage cluster.
Open the INFRASTRUCTURE > Nodes screen and click a node in the UNASSIGNED list.
On the node overview screen, click Create cluster and type a name. To add a secondary node, click Join cluster in the right pane.
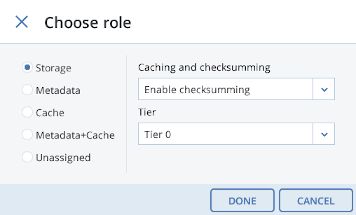
For the evaluation scenario, you need to assign a node’s storage disks to various tiers (refer to Understanding Storage Policies). For node 1, assign SSDs to tier 2. To do that, click Advanced configuration. You will be taken to the list of drives on the node on the Join cluster or New cluster panel. Select one or more drives on the list, and then click Configure on the right. On the Choose role screen, select the required tier. In a similar way, assign SSDs to tier 2, and HDDs to tier 3 for nodes 2 and 3. For more information on disk roles, refer to “Creating the Storage Cluster” in the Administrator’s Guide.
Click NEW CLUSTER or JOIN CLUSTER. On the Configuration summary screen, check the disk settings. Click PROCEED. You can monitor the disk configuration progress on the INFRASTRUCTURE > Nodes screen.