Exporting Data via iSCSI
Acronis Storage allows you to export cluster disk space to external operating systems and third-party virtualization solutions in the form of LUN block devices over iSCSI in a SAN-like manner.
In Acronis Storage, you can create and run multiple iSCSI targets per cluster node. In turn, each iSCSI target can have multiple LUNs (virtual disks). At any given moment, each iSCSI target runs on a single node. If a node fails, iSCSI targets hosted on it are moved to and re-launched on a healthy node.
The figure below shows a typical setup for exporting Acronis Storage disk space over iSCSI.
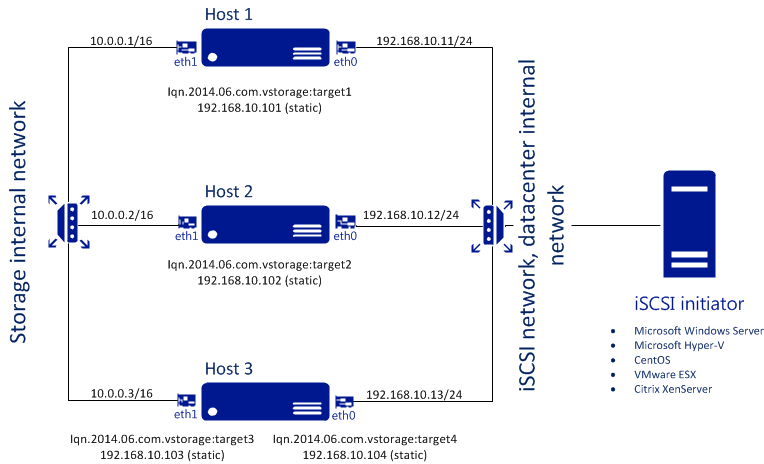
In this example, two Acronis Storage nodes host one iSCSI target each, while the third hosts two iSCSI targets. Each node connects to two networks: internal for storage cluster communication and external (in relation to the storage cluster) for iSCSI exporting. Each iSCSI target has a unique static IP address from a dedicated subnet of the datacenter network.
Creating iSCSI Targets
Note
- Each iSCSI target must be assigned at least one unique IP address from DC network’s static pool.
- The name of each iSCSI target must be unique in the Acronis Storage cluster.
- Acronis Storage iSCSI targets support persistent reservations to allow iSCSI initiators obtain exclusive access to the specified target’s LUNs.
To create a target, do the following:
On the SERVICES > iSCSI > Targets screen, click ADD TARGET.
On the Add target panel, type a name for the new target in the Name field.
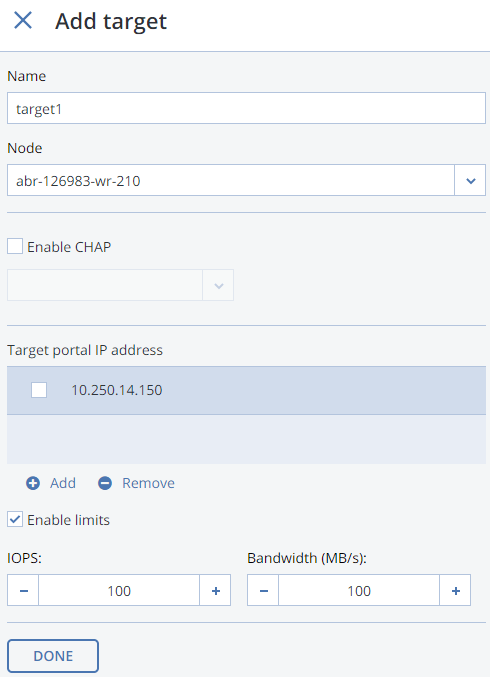
In the node drop-down list, select a node on which the target will be located. The node should have an iSCSI role assigned to one of its network interfaces to appear in the list.
If necessary, check the Enable CHAP box and select an iSCSI user in the corresponding drop-down list (For more information on CHAP users, see Managing iSCSI Users).
Click Add to specify one or more IP addresses for the target.
If necessary, enable and specify IOPS and bandwidth limits for the target. If both limits are set, the first one that is hit is applied. Setting a limit value to zero disables the limit.
Click Done to create the target.
The ISCSI target will be automatically started after creation and the initiators will be able to access the target via the specified IP address.
Performance Tips
- Spread iSCSI targets evenly across nodes in the cluster. For example, ten nodes with one iSCSI target per each will perform better than a single node with ten iSCSI targets on it.
- Fewer LUNs per more iSCSI targets will perform better than more LUNs per fewer iSCSI targets.
Listing, Stopping, and Deleting iSCSI Targets
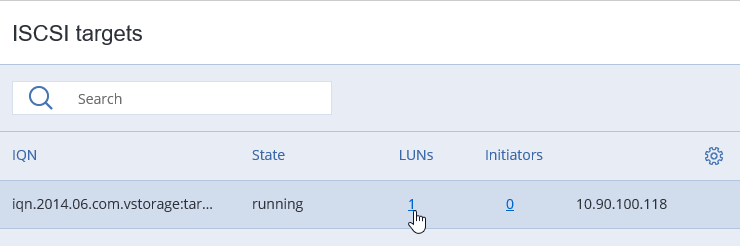
On the iSCSI targets screen, you can list and manage all iSCSI targets and their LUNs, and display detailed information about specific iSCSI targets registered on a node.
To stop or delete an iSCSI target, select it on the iSCSI targets screen and click Stop or Delete, respectively. Doing so will disconnect the iSCSI initiator from the target. However, breaking the connection in such a way may result in I/O errors on the iSCSI initiator’s side.
Configuring iSCSI Targets
To configure an iSCSI target, do the following:
On the SERVICES > iSCSI > Targets screen, select the necessary target and click Configure.
On the Configure target screen, specify the necessary parameters.
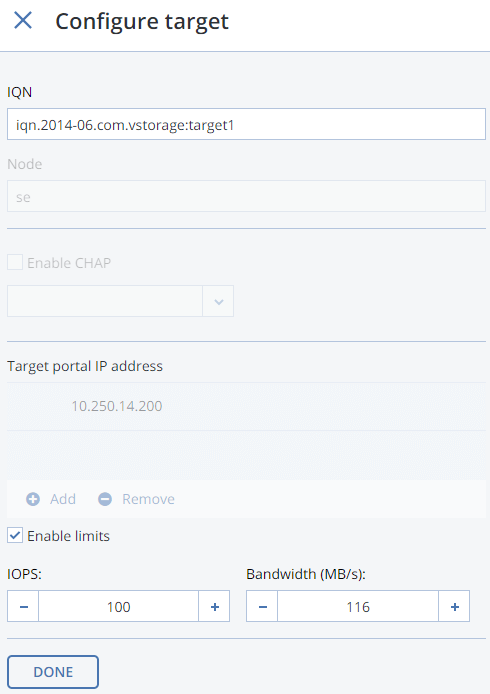
Click Done.
Listing LUNs
Each iSCSI target can have multiple LUNs (virtual disks or volumes). You can list the LUNs of a target and iSCSI initiators that are currently connected.
To list the LUNs, open the SERVICES > iSCSI > Targets screen, select a target and click a link in the LUNs column.
To list the initiators that are currently connected to iSCSI targets, open the INITIATORS tab on the same screen.
Adding LUNs
To add a LUN to an iSCSI target, do the following:
On the SERVICES > iSCSI > Targets screen, select the necessary target and click a link in the LUNs column.
To add a new LUN to the list, click ADD LUN.
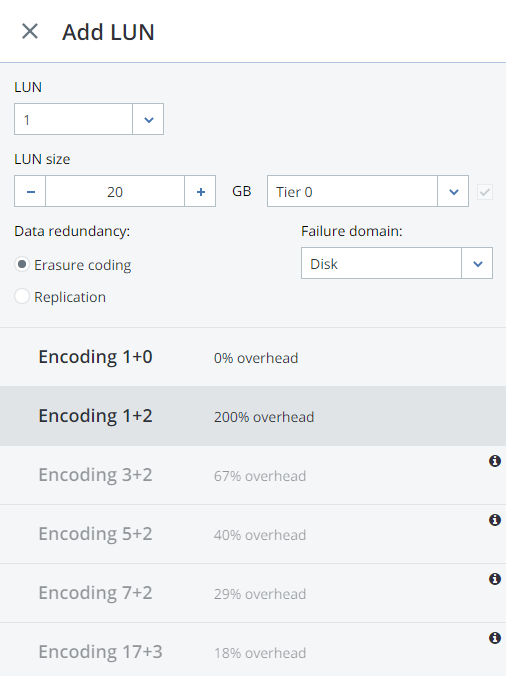
On the Add LUN screen, select the LUN’s number from the drop-down list.
In the LUN Size field, specify the size of the LUN in GB; select a tier from the drop-down list to the right. For more information on tiers, see the Installation Guide.
From the Failure domain drop-down list, choose a placement policy for replicas. For more details, see the Installation Guide.
Choose a data redundancy mode. For more details, see the Installation Guide.
Click Done.
Configuring LUNs
To configure a LUN of an iSCSI target, do the following:
- On the SERVICES > iSCSI > Targets screen, stop the target to which the LUN belongs.
- Click a link in the target’s LUNs column.
- On the Configure LUN screen, specify the LUN size in the corresponding field.
- Click Done.
Deleting LUNs
To delete a LUN, do the following:
- On the SERVICES > iSCSI > Targets screen, select the necessary target and click a link in the LUNs column.
- Select the necessary LUN in the list and click Delete.
Managing iSCSI Users
You can restrict access to iSCSI targets by means of CHAP authentication.
To make use of CHAP authentication, you need to:
- Create a CHAP account.
- Create an iSCSI target bound to this CHAP account.
These actions are described in detail in the following subsections.
Creating CHAP Accounts for iSCSI Targets
To create a CHAP account, do the following:
On the SERVICES > iSCSI Users screen, click Add user.
Specify login, password, and, if necessary, a description for the account. The password should be 12 to 16 characters long for Windows clients to be able to establish connections.
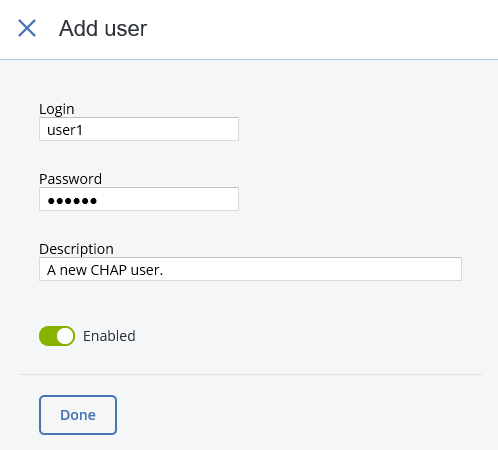
Click Done.
The newly created CHAP user account will be listed on the iSCSI Users screen.
Creating iSCSI Targets Bound to CHAP Accounts
To create an iSCSI target bound to a CHAP account, do the following:
On the SERVICES > iSCSI > Targets screen, select an iSCSI target and click Configure.
On the Configure target screen, check Enable CHAP and/or Enable mutual CHAP and select users in the corresponding drop-down lists. If you enable CHAP, the target will authenticate the initiator. If you enable mutual CHAP, the initiator will authenticate the target. These options can be enabled in any combination.

Click Done.
Changing CHAP Account Passwords
To change the password of a CHAP account, do the following:
On the SERVICES > iSCSI Users screen, select a user and click Configure.
In the Password section on the Configure user screen, click change.
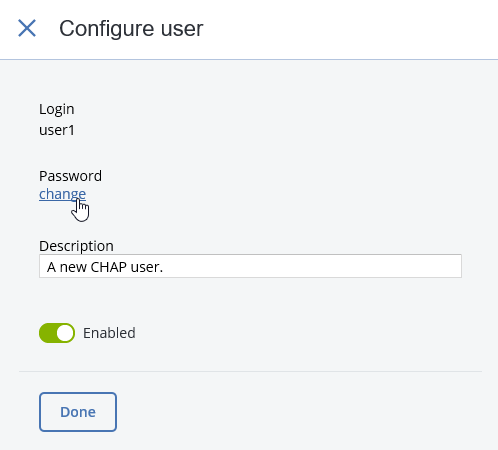
Type a new password in the corresponding field and click Done. The password should be 12 to 16 characters long for Windows clients to be able to establish connection.
The new password will become active after target reboot.